WP Ghost works on Bitnami Nginx servers (AWS Lightsail, Google Cloud, Azure) with one manual step. Bitnami WordPress stacks running Nginx don’t use .htaccess files. After activating WP Ghost, you need to add an include line to the Bitnami Nginx server block config file so Nginx loads WP Ghost’s rewrite rules. This is a one-time edit. If your Bitnami stack uses Apache instead of Nginx, see the AWS Lightsail Apache Setup guide.
Why Bitnami Nginx Requires Extra Setup

Nginx doesn’t support .htaccess files. On standard Nginx servers, WP Ghost writes rewrite rules to a hidemywp.conf file and you include it in your Nginx config. Bitnami uses its own directory structure for Nginx config files, so you need to add the include line to the Bitnami-specific server block config. WP Ghost generates the hidemywp.conf file automatically in your WordPress root directory, and the include line tells Nginx where to find it.
Step 1: Activate WP Ghost
- Install and activate the WP Ghost plugin.
- Go to WP Ghost > Change Paths > Level of Security.
- Select Safe Mode or Ghost Mode.
- Click Save.
- WP Ghost displays a notification with the include line you need to add to the Nginx config.
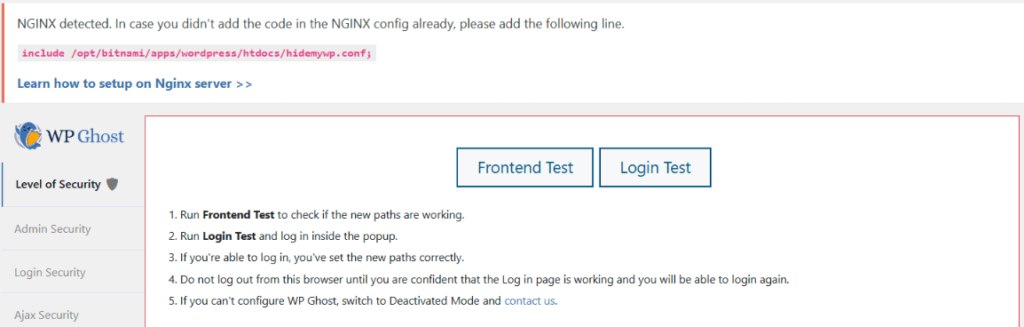
Step 2: Add the Include to the Nginx Config
- SSH into your Bitnami instance.
- Open the Bitnami Nginx server block config file:
sudo nano /opt/bitnami/nginx/conf/server_blocks/myapp-server-block.conf- Add the include line from the WP Ghost notification inside the
server { }block:
server {
    listen 80 default_server;
    root /opt/bitnami/myapp;
    server_name _;
    include "/opt/bitnami/nginx/conf/bitnami/*.conf";

    # WP Ghost rewrite rules
    include /opt/bitnami/apps/wordpress/htdocs/hidemywp.conf;
}- Save and exit: press Ctrl + X, then Y, then Enter.
Use the exact include line from WP Ghost’s notification. The file path depends on your WordPress installation location. The example above shows the default Bitnami path, but your path may differ. Always copy the include line directly from WP Ghost’s notification rather than typing it manually.
Newer Bitnami layout: If the config file path above doesn’t exist, your Bitnami instance may use a newer directory layout. Try /opt/bitnami/nginx/conf/server_blocks/wordpress-server-block.conf or run find /opt/bitnami/nginx -name "*server-block*" to locate the correct file.
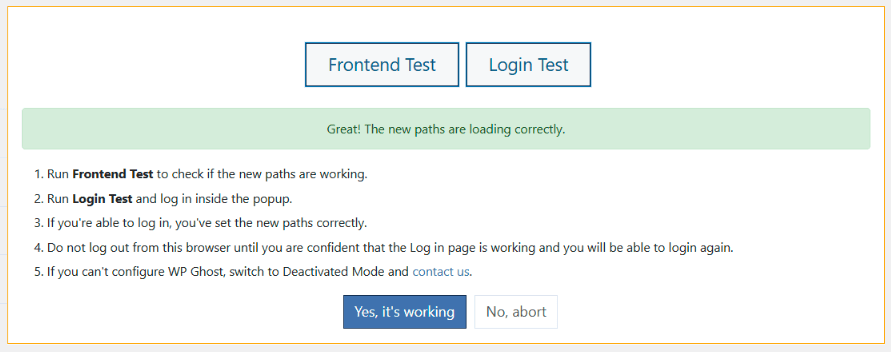
Step 3: Restart Nginx and Test
- Test the Nginx config for syntax errors:
sudo nginx -t- If the output shows
syntax is okandtest is successful, restart Nginx:
sudo /opt/bitnami/ctlscript.sh restart nginx- Go back to WP Ghost and run the Frontend Login Test.
- If everything loads correctly, click “Yes, it’s working”.
- If something is broken, click “No, abort” to roll back.
Troubleshooting
Nginx syntax error after adding the include
The hidemywp.conf file may not exist at the specified path, or the include line is placed outside the server { } block. Verify the file exists with ls -la /opt/bitnami/apps/wordpress/htdocs/hidemywp.conf. If it doesn’t exist, go back to WP Ghost and re-save your settings to regenerate it. Make sure the include line is inside the server { } block, not outside it.
Config file path doesn’t exist
Bitnami has changed its directory layout over time. Run find /opt/bitnami/nginx -name "*server-block*" to locate the correct server block config file. Newer Bitnami stacks may use /opt/bitnami/nginx/conf/server_blocks/wordpress-server-block.conf or similar paths.
Custom paths return 404
The include line may be placed after conflicting location blocks. Place the include line before any location / blocks in the server config so WP Ghost’s rewrite rules are processed first. Restart Nginx after adjusting placement.
Locked out after configuration
SSH into your instance and either fix the Nginx config or use the Safe URL parameter to bypass WP Ghost temporarily. If that doesn’t work, see the Emergency Disable guide.
Frequently Asked Questions
What if my Bitnami stack uses Apache instead of Nginx?
This guide is for Bitnami Nginx stacks. If your Bitnami WordPress installation uses Apache, follow the AWS Lightsail Apache Setup guide instead. You can check your web server with nginx -v (Nginx) or apachectl -v (Apache) via SSH.
Is the include a one-time setup?
Yes. The include line references the hidemywp.conf file, which WP Ghost updates automatically when you save settings. You only need to add the include line once. However, you do need to restart Nginx after changing WP Ghost path settings so Nginx reloads the updated config with sudo /opt/bitnami/ctlscript.sh restart nginx.
Does this work on all cloud providers?
Yes. This guide applies to Bitnami WordPress Nginx stacks on any cloud provider: AWS Lightsail, Google Cloud, Microsoft Azure, Oracle Cloud, or any host running Bitnami images. The directory structure and commands are the same regardless of cloud provider.
Does WP Ghost modify WordPress core files?
No. WP Ghost generates a separate hidemywp.conf file and uses WordPress hooks for application-level changes. No core files are modified. Deactivating WP Ghost restores all defaults instantly.
Related Tutorials
Bitnami and server configuration:
- AWS Lightsail Apache Setup – Bitnami Apache configuration guide.
- Custom Nginx Config File – Standard Nginx setup (non-Bitnami).
- Google Cloud Platform Setup – Google Cloud Apache configuration.
- Safe URL Parameter – Bypass WP Ghost temporarily if needed.
- Emergency Disable – Recovery via SSH if needed.