Prevent plugin detection and block targeted exploits by changing the plugins path, renaming plugin directories, and hiding the old path with WP Ghost. Plugins are responsible for 96% of WordPress vulnerabilities. Every plugin you install creates a directory inside /wp-content/plugins/ with its exact name – and scanners like WPScan enumerate those directories to build a complete list of what you’re running. Hide the path, and they lose the map.
What Is the Plugins Path in WordPress?

The plugins path is the directory where WordPress stores all installed plugins and their files. Each plugin lives in its own subfolder containing PHP scripts, CSS stylesheets, JavaScript files, images, and a readme.txt file with version information.
By default, it sits at: https://yourdomain.com/wp-content/plugins/
The average WordPress site has 22 installed plugins (WPScan). Every single one creates a named directory inside /wp-content/plugins/ that appears in your page source through CSS, JavaScript, and image URLs. If you use Contact Form 7, your source shows /wp-content/plugins/contact-form-7/. If you use Elementor, it shows /wp-content/plugins/elementor/. WooCommerce, Yoast SEO, Wordfence – they all announce themselves through their directory names.
Vulnerability scanners exploit this predictability. WPScan makes one API request per installed plugin to check for known vulnerabilities. It finds your plugins by probing /wp-content/plugins/ with known plugin directory names, or by reading your page source. If it finds a match, it cross-references the plugin name and version against its database of 64,782 tracked vulnerabilities. The entire process takes seconds.
Why You Need to Secure the Plugins Path
If you could only secure one subdirectory inside wp-content, this should be it. Plugins are where the vast majority of WordPress vulnerabilities live. Here’s why hiding the plugins path is critical for your hack prevention strategy:
Plugins account for the overwhelming majority of WordPress vulnerabilities. Of the 7,966 new vulnerabilities discovered in 2024, the vast majority were in plugins (Patchstack State of WordPress Security 2025). That’s 22 new plugin vulnerabilities every single day. When an attacker knows which plugins you run and which versions they are, they can check every single one against the vulnerability database. Remove the plugin names from your page source, and this entire attack chain breaks.
Readme.txt files in plugin directories reveal exact version numbers. Every WordPress plugin ships with a readme.txt at /wp-content/plugins/plugin-name/readme.txt containing the exact version, changelog, and compatibility information. Scanners read these files to determine if you’re running a vulnerable version. WP Ghost’s plugin name hiding makes these files unreachable through the original path. For additional protection, hide TXT file extensions from common paths.
Inactive plugins are just as dangerous as active ones. WordPress keeps deactivated plugins on the server with their files fully accessible. If a deactivated plugin has a known vulnerability, attackers can still target its PHP files directly through the /wp-content/plugins/ path. The plugin doesn’t need to be active to be exploited – it just needs to be present. Hiding all plugins (not just active ones) blocks this vector completely.
Plugin detection reveals your entire technology stack. Knowing your plugins tells attackers more than just which plugins to exploit. It reveals your site’s purpose (WooCommerce = e-commerce, LearnDash = courses), your form handling (Contact Form 7, Gravity Forms), your security setup (Wordfence, Sucuri), and your page builder (Elementor, Divi). That intelligence guides every subsequent attack decision. Hide the plugin names, and attackers are working blind.
How to Secure the Plugins Path with WP Ghost
WP Ghost offers five layers of plugin protection under the Plugins Security tab. Each one targets a different detection method. For maximum protection, enable all of them.
Activate Safe Mode or Ghost Mode
Before you can change any paths, one of WP Ghost’s security levels must be active.
- Go to WP Ghost > Change Paths > Level of Security.
- Select Safe Mode or Ghost Mode.
- Click Save to apply.
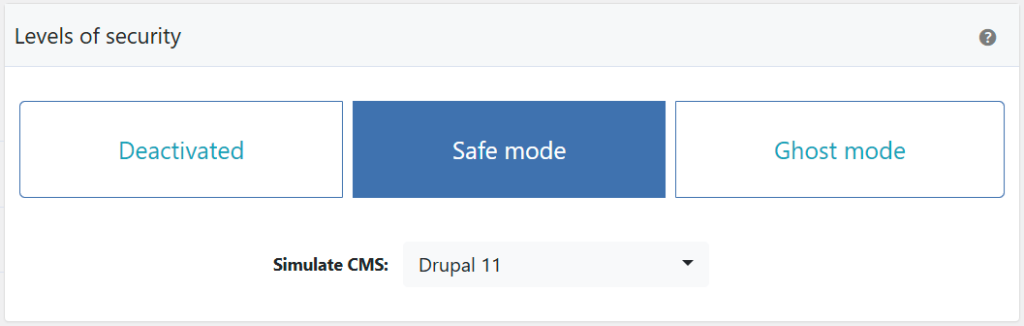
Need help choosing? Check the Safe Mode vs Ghost Mode comparison.
Change the Plugins Path
This replaces the /plugins/ subdirectory name within wp-content. Instead of /wp-content/plugins/contact-form-7/, your plugin assets load from /wp-content/your-custom-name/contact-form-7/. This alone breaks every scanner that looks for the /plugins/ keyword in your page source.
- Go to WP Ghost > Change Paths > Plugins Security.
- Find the Custom Plugins Path field.
- Enter a different name or keep the predefined one.
- Click Save to apply.

Hide Plugin Names
Changing the plugins path hides the word “plugins” but still shows actual plugin directory names like “elementor” or “woocommerce” in your page source. This option replaces all active plugin directory names with randomly generated codes. The path /elementor/ becomes something like /p3x9k/.
- Go to WP Ghost > Change Paths > Plugins Security.
- Switch on Hide Plugin Names.
- Click Save to apply.

Hide All the Plugins
Hide Plugin Names only renames active plugins. But deactivated plugins still sit on your server with their real names and accessible files. If a deactivated plugin has a known vulnerability, attackers can target its PHP files directly. This option renames both active and deactivated plugin directories.
- Go to WP Ghost > Change Paths > Plugins Security.
- Switch on Hide All the Plugins.
- Click Save to apply.

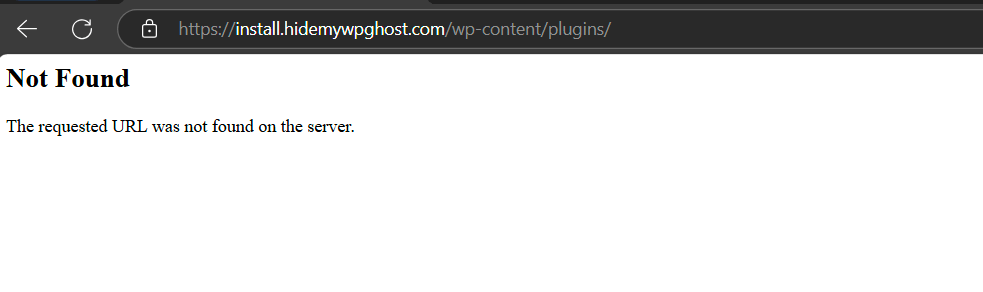
Hide the Old Plugins Path
After changing the plugins path, the original /wp-content/plugins/ URL might still respond to direct requests. This option blocks it. Any request to the old path returns a 404 error.
- Go to WP Ghost > Change Paths > Plugins Security.
- Switch on Hide WordPress Old Plugins Path.
- Click Save to apply.

Bots hitting the old plugins path now get a dead end:
Advanced Options: Custom Plugin Names
By default, Hide Plugin Names assigns random codes to each plugin. If you want to control those names (useful for developers who need to identify specific plugins in the source code), the Advanced Options let you assign custom names to individual plugins.
This section is optional. Most users should skip it and let WP Ghost generate random names automatically.
- Make sure Hide Plugin Names is enabled first.
- Click Show Advanced Options to reveal the customization panel.
- Select a plugin from the dropdown. WP Ghost detects all installed plugins automatically. (Enable Hide All the Plugins to include deactivated plugins in the list.)
- Enter a custom name for that plugin in the field provided.
- Click Save to apply.

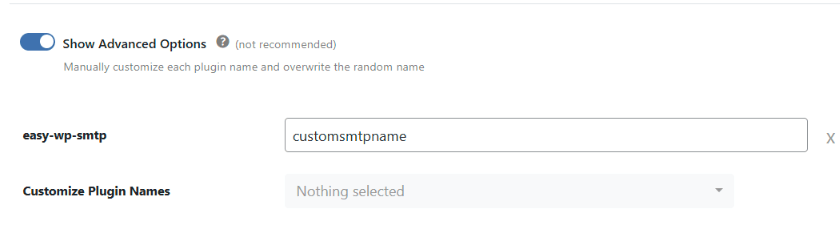
Note: Use unique names that don’t match your custom path names. For Multisite installations, WP Ghost displays all plugins regardless of the Hide All setting. To remove a custom name, click the X next to the plugin name to revert to a random code.
For a practical guide to hiding specific popular plugins, see the Hide Plugins Like WooCommerce and Elementor tutorial.
Verify with a Security Check
After saving all your plugin security settings, run a scan to confirm everything works.
- Go to WP Ghost > Security Check.
- Click Start Scan.
- If everything is working, the security task is marked complete.

Quick manual check: view your page source and search for any plugin name you know you have installed (e.g., “elementor”, “woocommerce”, “contact-form-7”). If none appear, plugin security is working. For everything the scanner checks, see the Security Check tutorial.
What Happens After You Secure the Plugins Path
Save your settings and the protections activate immediately:
WPScan and other vulnerability scanners fail to enumerate your plugins. WPScan’s plugin detection relies on probing known plugin directory names inside /wp-content/plugins/. With a custom path and hidden names, none of those probes match. The scanner reports zero detected plugins. No plugin detection means no targeted exploits.
All plugin functionality continues working normally. Contact forms submit. Page editors load. WooCommerce carts update. SEO plugins generate sitemaps. Nothing changes for your visitors or your admin experience. WP Ghost serves files from the original directories through the new URLs.
Plugin readme.txt files become unreachable through the old path. With the old path hidden, requests to /wp-content/plugins/plugin-name/readme.txt return a 404. Scanners can no longer read version numbers from these files. For extra protection, also hide TXT file extensions from common paths.
Clear your cache after making changes. Cached pages may still contain old plugin paths until the cache is refreshed. If you use WP Rocket, LiteSpeed Cache, or other caching plugins, clear the cache after saving. For minified CSS/JS, also enable Change Paths in Cached Files.
Troubleshooting
Theme Breaks or The Layout Doesn't Load Correctly
If your theme’s layout is broken, CSS styles are missing, or the site looks unstyled after changing paths in WP Ghost, the custom paths for CSS and JS files aren’t resolving on your server. The browser can’t load stylesheets and scripts from the new paths, so the theme renders without styling.
Clear all caches
This is the most common cause. Cached pages still reference the old CSS and JS paths. Clear your WordPress cache plugin, CDN cache, and browser cache. Enable Change Paths in Cached Files at WP Ghost > Change Paths so cached CSS/JS files are rewritten with the new paths. Check in an incognito window after clearing.
Run the Frontend Test
Go to WP Ghost > Change Paths and click the Frontend Test button. If the test fails, your server’s rewrite rules aren’t mapping the custom paths to the original directories. Follow the configuration instructions shown for your server type.

Check server configuration
Nginx: The hidemywp.conf file must be included in your Nginx server block and the service restarted. Without this, Nginx returns 404 for all custom paths. See Setup WP Ghost on Nginx Server.
Apache: Verify that AllowOverride is set to All in your server configuration. Without this, Apache ignores the .htaccess rewrite rules WP Ghost writes. See How to Set AllowOverride All.
Check Text Mapping
If you’ve renamed CSS class names using WP Ghost > Mapping > Text Mapping but didn’t enable Text Mapping in CSS and JS files, the HTML uses the new class names while stylesheets still reference the old ones. This breaks styling. Either enable the CSS/JS mapping option, or remove the class name mapping that’s causing the issue.
Inspect which files fail to load
Open your browser’s developer console (F12 > Console or Network tab) and look for red 404 errors on CSS and JS files. The URLs will show which custom paths aren’t resolving. If all custom paths return 404, it’s a server configuration issue (see above). If only specific paths fail, those paths may have typos in the WP Ghost settings.
For a comprehensive guide on server configuration for theme loading, see Theme Not Loading Correctly. If you’ve lost access to the admin dashboard, see the emergency disable guide.
If you’ve lost access or something broke, check the emergency disable guide, use the rollback settings, or add a constant in wp-config.php to disable WP Ghost temporarily.
Frequently Asked Questions
Will changing the plugins path break my plugins?
No. All plugins continue working normally. WP Ghost uses rewrite rules that serve files from the original /wp-content/plugins/ directory through the new URLs. Plugins don’t need to know their URL changed – WordPress handles the routing. Contact forms, page builders, SEO plugins, WooCommerce, and every other plugin function exactly the same.
Does this work with WooCommerce?
Yes. WooCommerce is a plugin that loads its assets from /wp-content/plugins/woocommerce/. Changing the plugins path and hiding the name makes WooCommerce assets load through the custom path with a random directory name instead. Cart, checkout, product pages, and all WooCommerce functionality work normally. WP Ghost is fully compatible with WooCommerce.
Why should I hide deactivated plugins?
Because deactivated plugins are still exploitable. Their PHP files remain on the server and are accessible through the default /wp-content/plugins/ path even when the plugin isn’t active. If a deactivated plugin has a known vulnerability, attackers can still target its files. Enabling Hide All the Plugins renames both active and deactivated directories. Better still: delete any plugins you don’t actively use.
Should I also change the themes path?
Yes. Plugins and themes are both inside /wp-content/. If you hide your plugins but leave themes visible, scanners can still confirm WordPress through theme paths. For complete security, also change the themes path and change the wp-content path.
Does this work on WordPress Multisite?
Yes. On Multisite installations, WP Ghost displays all plugins in the Advanced Options dropdown regardless of whether Hide All the Plugins is enabled. Plugin path changes apply network-wide.
Will this affect SEO?
No. Plugin path changes affect asset URLs (CSS, JavaScript, images used by plugins), not your public page URLs. Search engines don’t index or rank based on plugin file paths. Your posts, pages, sitemaps, and canonical URLs remain unchanged.
Does WP Ghost modify WordPress core files?
No. WP Ghost never touches, moves, or renames any file or folder. Plugin files stay in /wp-content/plugins/ exactly where WordPress expects them. Virtual paths are created through URL rewrite rules. Deactivating WP Ghost restores all original paths instantly.
Related Tutorials
Continue building complete WordPress invisibility:
- Change the Themes Path – Rename /themes/ and hide individual theme directory names.
- Change the wp-content Path – Hide the parent directory of plugins, themes, and uploads.
- Hide Plugins Like WooCommerce and Elementor – Practical guide to hiding specific popular plugins.
- Change the admin-ajax.php Path – Secure the AJAX endpoint that plugin exploits target.
- Hide WordPress Common Paths and Files – Block TXT, PHP, and JS file access from old paths.
- Hide from WordPress Theme Detectors – Complete CMS invisibility for scanners.
- Change Paths in Cached Files – Ensure custom paths work in minified CSS and JS.