Install the free version of WP Ghost from the WordPress directory, activate it with your email address, and start protecting your site in minutes. This guide walks you through the complete installation process: uploading the plugin, activating your free token, selecting a security level, customizing paths, and running your first Security Check. WP Ghost works on Apache, Nginx, LiteSpeed, and IIS servers.
Install and Activate WP Ghost
- Log in to your WordPress dashboard as an administrator.
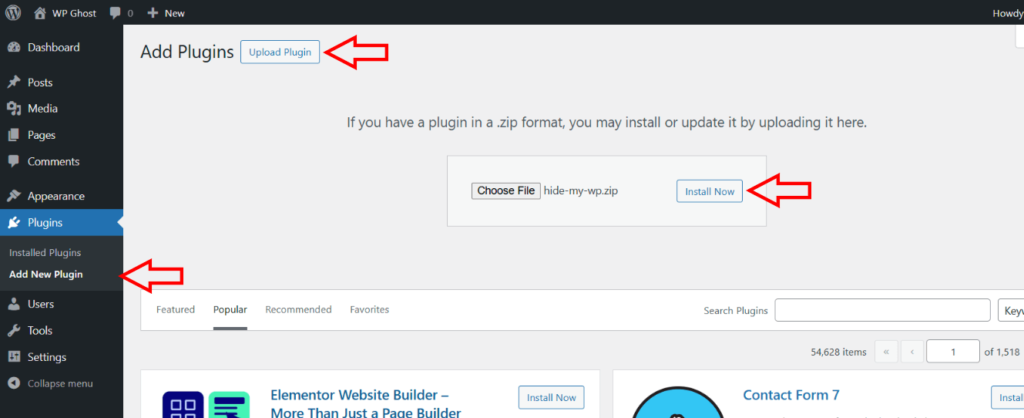
- Go to Plugins > Add New Plugin.
- Click Upload Plugin at the top of the page.
- Browse and upload the hide-my-wp.zip file.
- Click Activate Plugin.
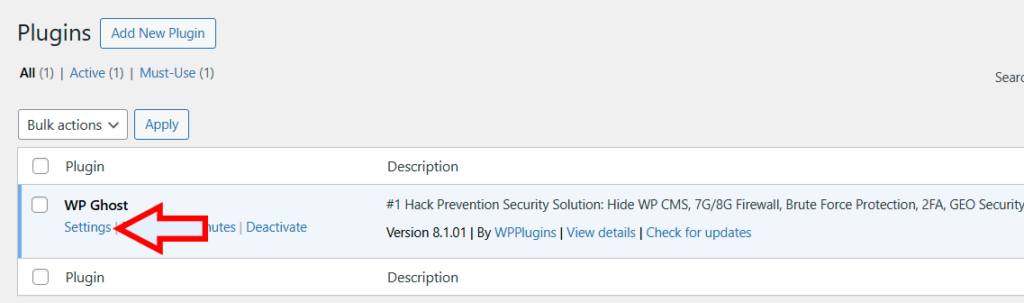
- From the plugins list, click the Settings link to go to WP Ghost settings.
Alternative install method: You can also search for “WP Ghost” directly in Plugins > Add New and install from the WordPress directory without downloading the zip file.
Activate Your Free Token
After activation, WP Ghost prompts you to connect with your email address. This activates your free license and gives you access to the WP Ghost Dashboard where you can manage all your connected websites, monitor security, and receive reports.
- Enter your email address in the activation field.
- Click Activate to register the free license on your website.

Activation is optional. If you don’t want to connect to the WP Ghost Dashboard, click Skip Activation. The plugin works without activation, but you won’t have access to cloud monitoring, security reports, or the Events Log cloud storage. You can activate later from the plugin settings.
Select a Security Level
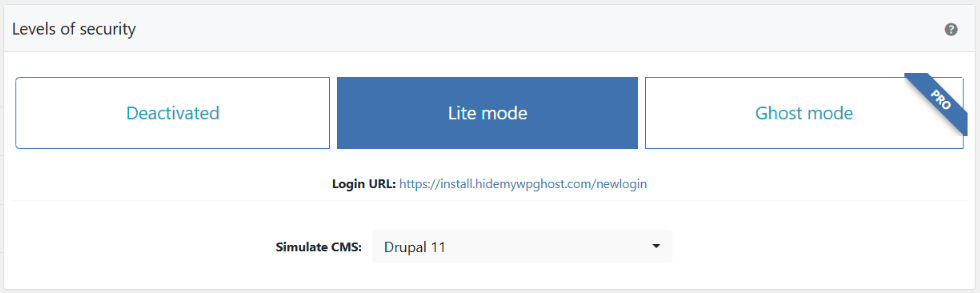
After activation, you’re redirected to the WP Ghost > Overview page. Go to WP Ghost > Change Paths > Level of Security to choose your protection level.
Lite Mode is the security level included in WP Ghost Free and is the recommended starting point for every new install. It changes the most commonly targeted WordPress paths – wp-login.php, plugin folders, theme folders, uploads, and core directories – while keeping wp-admin and admin-ajax.php at their defaults, so it stays compatible with virtually every plugin and theme. Select it and click Continue in the popup to load predefined paths.
Safe Mode and Ghost Mode are WP Ghost Premium features. Lite Mode is the correct choice on the free version. Safe Mode (Premium, maximum compatibility) and Ghost Mode (Premium, maximum security) extend path coverage to wp-admin and admin-ajax.php and unlock automated IP blocking, country blocking, AI crawler blocking, and the full Events & Threats Log. Upgrade anytime – your Lite Mode settings are preserved.

For a deeper understanding of all three security levels, see WP Ghost Security Modes: Lite, Safe & Ghost Mode Explained. For one-click configurations that include firewall, brute force, and more, see Preset Security Options.
Customize Your Paths
After selecting Lite Mode, WP Ghost generates predefined custom paths for every WordPress location it protects. You can use the defaults or customize each path to your preference. The settings are organized into sections:
Admin Security – hide the wp-admin path from non-logged-in visitors (renaming wp-admin is a Safe Mode / Ghost Mode Premium feature).
Login Security – customize the wp-login.php path.
Ajax Security – customize how admin-ajax.php appears in the frontend (renaming admin-ajax.php is a Safe Mode / Ghost Mode Premium feature).
User Security – customize the author path.
WP Core Security – customize wp-content, wp-includes, and common paths and files.
Plugins Security – customize the plugins path and individual plugin names.
Theme Security – customize the themes path and individual theme names.
API Security – customize the REST API path and manage XML-RPC access.
Firewall & Headers Security – activate the 7G/8G firewall rules and security headers (fully included in WP Ghost Free).
Important: Remember your new login path. After saving, the default /wp-login.php is no longer accessible to visitors. Bookmark your custom login URL immediately. If you forget it, use the Safe URL parameter to regain access.
After customizing, click Save to apply the changes.
Server Configuration
If WP Ghost can’t write rewrite rules to your server config file automatically, it shows the rules you need to add manually. Follow the on-screen instructions for your server type and click Okay, I set it up.
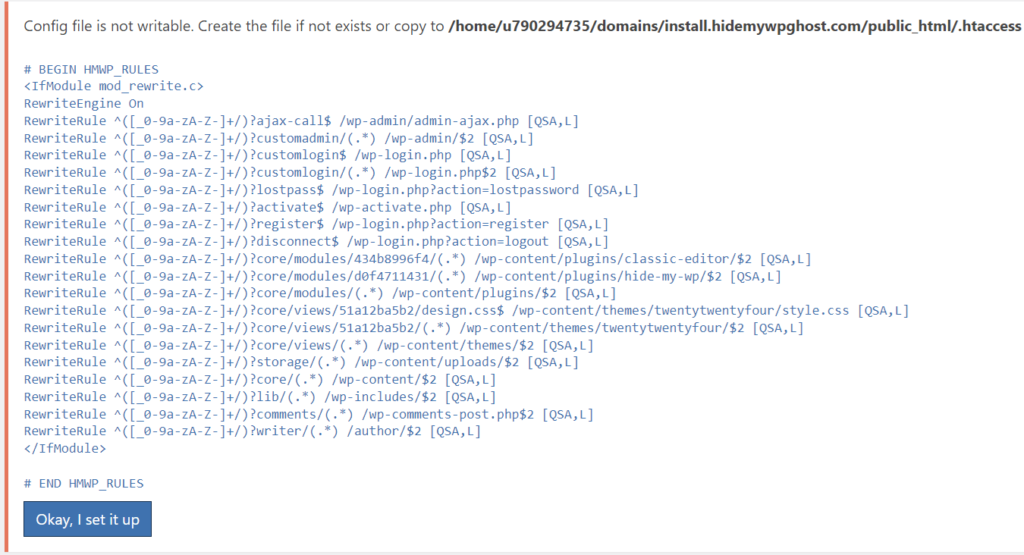
For Nginx: Add the config include line to your nginx.conf and restart Nginx with sudo nginx -s reload. This is a one-time setup – WP Ghost stores rules in a hidemywp.conf file that Nginx includes automatically. See Setup WP Ghost on Nginx Server for full instructions.

For Apache: Ensure AllowOverride All is set for your directory. See Set AllowOverride All on Apache.
If you can’t edit server config files at all (managed hosting like Kinsta, WP Engine, Flywheel), see Use WP Ghost on Nginx Without Config Changes for the features that work without rewrite rules.
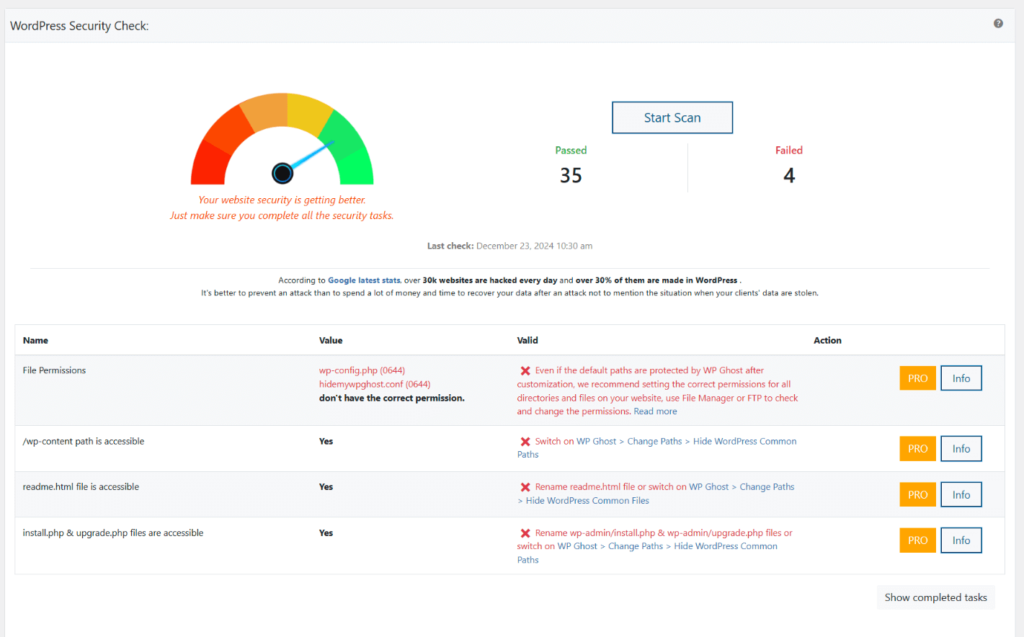
Run a Security Check
After saving your configuration, verify everything is working. Go to WP Ghost > Security Check > Start Scan. WP Ghost runs security tasks and reports which checks pass. The Security Optimization Score shows how well your site is protected on a 0–100 scale.
For a comprehensive security setup beyond the basics, continue with Customize Paths with WP Ghost, then Activate Brute Force Protection, and finally Hide from Theme Detectors.
Frequently Asked Questions
Is the plugin free?
Yes. WP Ghost Free includes Lite Mode path security, the full 7G and 8G firewall, brute force protection with all reCAPTCHA types, 2FA (Code, Email, Passkey), security headers, and 115+ hardening features. WP Ghost Premium unlocks Safe Mode and Ghost Mode, the Events Log, Threats Log, country blocking, AI crawler blocking, extended file extension security, automated IP blocking, and priority support.
Do I have to activate with my email?
No. Activation is optional. Clicking Skip Activation lets you use the plugin immediately. Activation gives you access to the WP Ghost Dashboard for cloud monitoring, security reports, and Events Log cloud storage.
What if I forget my custom login URL?
Use the Safe URL parameter to bypass WP Ghost temporarily. If that doesn’t work, rename the plugin folder via FTP (/wp-content/plugins/hide-my-wp to something else) to disable path changes, then log in at the default /wp-login.php. See the Emergency Disable guide for full instructions.
Which security level should I choose in the free version?
Lite Mode. It’s the security level included in WP Ghost Free and is compatible with virtually every plugin and theme. Safe Mode and Ghost Mode are Premium features – if you upgrade later, you can switch to either from WP Ghost > Change Paths > Level of Security without losing your custom path names.
Does this work with WooCommerce?
Yes. WP Ghost is fully compatible with WooCommerce. Lite Mode works with WooCommerce cart, checkout, product pages, and customer accounts without any additional configuration.
Does WP Ghost modify WordPress core files?
No. All path changes use server rewrite rules and WordPress hooks. No files are moved, renamed, or modified. Deactivating WP Ghost restores all defaults instantly.
Related Tutorials
Continue setting up your security:
- Customize Paths with WP Ghost – Detailed guide to changing all WordPress paths.
- Preset Security Options – One-click configurations for fast setup.
- Lite Mode vs Safe Mode vs Ghost Mode – Understand the three security levels.
- Prevent Hack Attacks – The complete WP Ghost security overview.