
Create passwordless, time-limited login URLs for developers, clients, and team members using WP Ghost’s Temporary Logins feature. When you need to give someone admin access to your WordPress site – a developer fixing a bug, a designer adjusting a theme, a content editor working on a deadline – sharing your password is a security risk. Temporary Logins generate a unique URL that grants dashboard access with a specific user role, no password required, and automatically expires after a set time. No passwords shared, no accounts to remember to delete.
What Is a Temporary Login?

Why Temporary Logins Are Safer Than Shared Passwords
The traditional approach – creating an admin account, sharing the password, and deleting the account later – has a critical flaw: “later” often doesn’t happen. Here’s why temporary logins are better for your hack prevention strategy:
No passwords are shared or stored. The login URL is the credential. No one types a password, no password is saved in a browser, no password can be leaked or reused. If the URL is compromised after expiration, it’s useless.
Access expires automatically. You set the duration – hours, days, or weeks. When the time is up, the account is disabled without any action from you. No forgotten admin accounts sitting dormant for months with full privileges.
Each person gets their own scoped access. You control the user role for each temporary login independently. A developer might get Administrator access; a content editor gets Editor. Each person’s access is scoped to exactly what they need, and each link is unique and trackable.
You can lock access instantly. If you need to revoke access before the expiration time, click the lock icon. The temporary login is disabled immediately – no password to change, no account to delete.
How to Set Up Temporary Logins
Activate the Feature
Temporary Logins is not active by default – you need to enable it first.
- Go to WP Ghost > Overview > Features.
- Switch on Temporary Logins in the features list.
- Click Start Feature Setup to access the settings page.

Configure Default Settings
Set the defaults that apply to every new temporary login you create. These can be overridden per login.
Default User Role – The user role assigned to new temporary accounts. Select from the dropdown (Subscriber, Editor, Administrator, etc.). Use the least-privileged role that accomplishes the task.

Default Redirect After Login – The page the temporary user sees after logging in. Set this to the Dashboard, a specific admin page, or a frontend page depending on what the user needs to access.

Default Expire Time – How long temporary accounts remain active. The timer starts after the user’s first access. Options range from hours to weeks.

Delete Temporary Users on Uninstall – When enabled, uninstalling WP Ghost automatically deletes all temporary user accounts created through this feature.
Note: The settings you configure for each individual temporary login override these defaults. These are starting values that save time when creating multiple accounts.
Create a Temporary Login
- Go to WP Ghost > Temporary Logins > Settings.
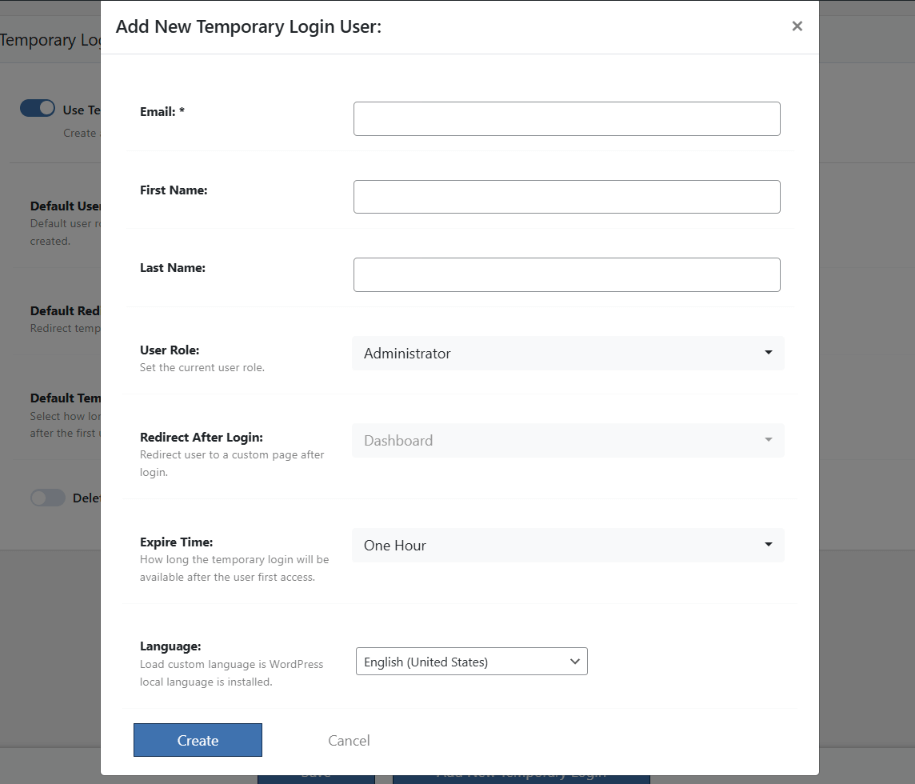
- Click Add New Temporary Login.
- Fill in the details: Email (required), First Name, Last Name, User Role, Redirect After Login, Expire Time, and Language.
- Click Create.
After creating the login, WP Ghost generates a unique URL. Copy it and share it with the intended recipient. They click the link and are logged in with the assigned role – no password needed.
Manage Temporary Logins
The Temporary Logins section shows all accounts you’ve created, including each user’s name, email, role, last login date, and expiry status. Four management actions are available for each account:
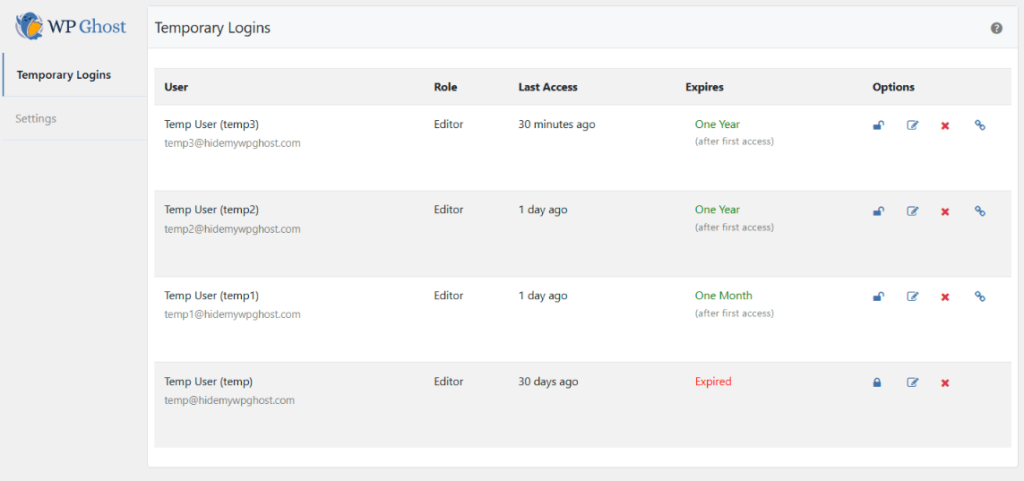
Lock/Unlock – Instantly disable or re-enable a temporary login before its expiration. Use the lock icon to revoke access immediately when a developer finishes early or if you need to pause their access.
Edit – Modify the user role, redirect page, or expiration time for an existing temporary account. Click the edit icon, make changes, and click Save User.
Delete – Permanently remove a temporary login user and their account from WordPress. Click the X icon. This is irreversible.
Copy URL – Copy the temporary login URL to your clipboard. Click the link icon and paste the URL to share it.
Troubleshooting
Temporary login URL redirects to the home page
Clear all caches. Caching plugins and server-level caching can interfere with the temporary login URL processing. Clear your cache plugin’s cache, server cache (Varnish, Redis), and CDN cache. Try accessing the URL in a different browser or incognito mode to rule out browser-level caching.
Check for plugin conflicts. Other security plugins may delete or override the session created by WP Ghost’s temporary login. Create a staging site and test with only WP Ghost active, then enable other plugins one by one to identify the conflict.
Verify the redirect setting. Edit the temporary user account and check the Redirect After Login option. Try setting it to Dashboard to redirect to the admin dashboard after login.
If you’ve lost access or something broke, check the emergency disable guide, use the rollback settings, or add a constant in wp-config.php to disable WP Ghost temporarily.
Frequently Asked Questions
Is sharing a URL secure?
The URL acts as a one-time-use credential with a built-in expiration. It’s more secure than sharing a password because it can’t be reused after expiration, can be revoked instantly, and doesn’t expose any password that could be reused on other accounts. Share it over a secure channel (encrypted email, direct message) rather than posting it publicly.
What happens when a temporary login expires?
The account is disabled automatically. The URL stops working, the user can’t log in, and any active session is ended. The account record remains in your Temporary Logins list so you can see the history, but the user has no access. You can delete the expired account or re-enable it by editing the expiration.
What user role should I assign?
Use the least-privileged role that accomplishes the task. A developer who needs to edit code needs Administrator. A content editor needs Editor. A client reviewing the site needs Subscriber or a custom role. Never give Administrator access unless the person specifically needs plugin/theme/settings access.
Can I create multiple temporary logins at once?
Yes. Each temporary login is independent – different email, different role, different expiration. You can have as many active temporary logins as you need simultaneously. Each gets its own unique URL.
Does WP Ghost modify WordPress core files?
No. Temporary Logins creates standard WordPress user accounts with an additional expiration mechanism managed by WP Ghost. No core files are modified. Disabling the feature or uninstalling WP Ghost removes all temporary accounts (if the delete-on-uninstall option is enabled).
Related Tutorials
Strengthen your access control and login security:
- Magic Link Login – Passwordless login for regular users via email link.
- Two-Factor Authentication – Add a second verification step to your login process.
- Change and Hide the Login Path – Move your login page to a custom URL.
- Brute Force Protection – Block login attacks with attempt limits and reCAPTCHA.