
Limit failed login attempts and add reCAPTCHA to your WordPress login, registration, password reset, and comment forms with WP Ghost’s Brute Force Protection. WordPress allows unlimited login attempts by default – bots exploit this to try thousands of password combinations automatically. WP Ghost adds attempt limits, configurable lockout duration, and four reCAPTCHA options (Math, Google V2, Google V3, and Google Enterprise) to block automated attacks. Protection extends to the login form, lost password form, registration form, comment form, and WooCommerce login. This is a free feature.
What Is a Brute Force Attack?

A brute force attack is an automated attempt to break into a website by trying different username and password combinations repeatedly until one works. Bots target WordPress login pages (wp-login.php, xmlrpc.php) and try common usernames like “admin” or “administrator” with passwords from dictionary lists. WordPress has no built-in limit on login attempts, making it vulnerable to these attacks by default.
A successful brute force attack gives the attacker full access to your admin dashboard – they can install malware, steal user data, modify content, or delete your entire site. Even unsuccessful attacks consume server resources and slow down your site for legitimate visitors.
Why Brute Force Protection Is Critical
Brute force attacks are the most common WordPress attack vector. Here’s why protection is essential for your hack prevention strategy:
Brute force attacks surged 130% in 2024. LLAR’s 2025 report documented a massive increase in automated login attacks against WordPress sites. Bots run 24/7, testing thousands of credential combinations per hour. Without attempt limits, every site with a weak password is eventually compromised.
WordPress has no default protection. Out of the box, WordPress allows unlimited login attempts with no throttling, no CAPTCHA, and no lockout. A bot can try 10,000 passwords per hour against a default WordPress installation. WP Ghost adds the missing limits.
Bots target more than just the login form. Password reset forms, registration forms, and comment forms are all attack surfaces. Bots abuse password reset to discover valid email addresses, registration forms to create spam accounts, and comment forms to inject spam links. WP Ghost protects all of these.
How to Enable Brute Force Protection
Activate Brute Force Protection
- Go to WP Ghost > Brute Force > Settings.
- Switch on Use Brute Force Protection.
- Select a reCAPTCHA type (Math, Google V2, V3, or Enterprise).
- Click Save.

Protected Forms
After activating Brute Force Protection, enable it on each form that needs protection:
Login Form – The primary target. Enabled by default when Brute Force Protection is activated. Adds reCAPTCHA to the WordPress login page.
Lost Password Form – Prevents bots from brute-forcing the password reset form to discover valid email addresses. Enable at Brute Force > Settings > Lost Password Form Protection.
Sign Up Form – Prevents bots from creating mass fake accounts. Enable at Brute Force > Settings > Sign Up Form Protection.
Comment Form – Blocks automated spam comments. Enable at Brute Force > Settings > Comment Form Protection. Also protects comment forms from plugins like WooCommerce, Elementor, and Divi.
Wrong Username Protection – Blocks IPs that submit login attempts with non-existent usernames. This prevents username enumeration. Enable at Brute Force > Settings > Wrong Username Protection.
Not recommended for membership sites: Wrong Username Protection can lock out users who forget their login credentials. Skip this option on sites where users may not remember their exact username or email.
WooCommerce Login – Adds Brute Force Protection to the WooCommerce login form. WP Ghost auto-detects WooCommerce. Enable at Brute Force > WooCommerce > WooCommerce Support.

Custom forms: For page builders (Elementor, Divi) that don’t automatically load WP Ghost’s brute force protection, use the shortcode hmwp_bruteforce to add protection to any form. See the Elementor integration guide.
Shared Settings
All reCAPTCHA types share the same lockout configuration. Set these once – they apply regardless of which reCAPTCHA type you use:
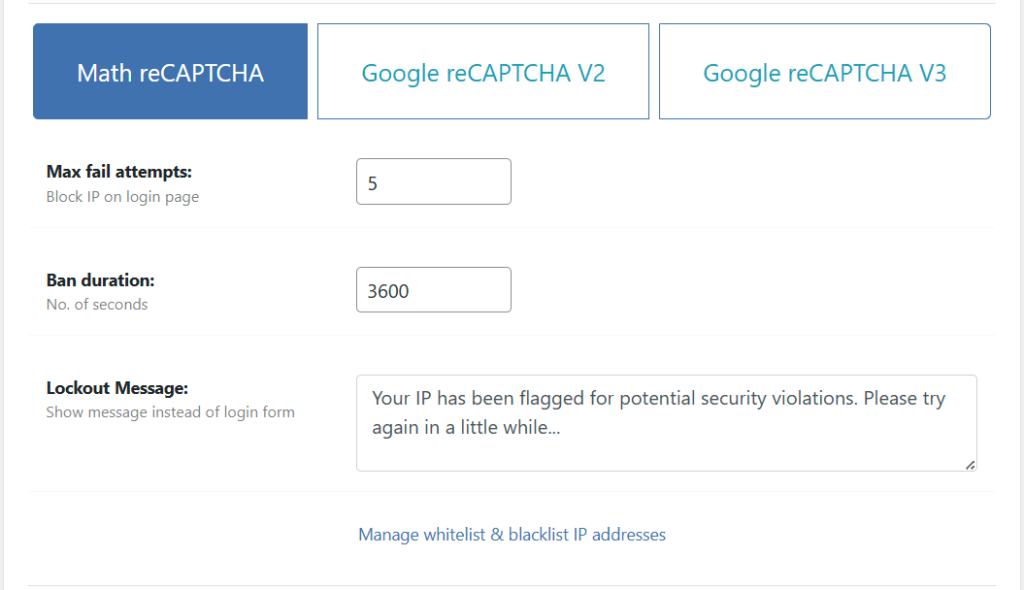
Max Failed Attempts – Number of failed login attempts before the IP is blocked. Default: 5.
Ban Duration – How long the IP stays blocked. Default: 1 hour.
Lockout Message – The message shown instead of the login form when an IP is blocked. Default: “Your IP has been flagged for potential security violations. Please try again in a little while.”
reCAPTCHA Options
Choose which reCAPTCHA type to use. Each type requires Brute Force Protection to be active first.
Math reCAPTCHA
Displays a simple math problem (e.g., “3 + 7 = ?”) that users solve to prove they’re human. No external services, no API keys, no Google dependency. The simplest option to set up – just activate and save.
To activate: Go to Brute Force > Settings → select Math reCAPTCHA → Save.
Google reCAPTCHA V2
Displays the “I’m not a robot” checkbox widget from Google. Passes most users immediately; challenges suspicious ones with image selection. Requires a Google reCAPTCHA V2 Site Key and Secret Key.
To activate:
- Go to Brute Force > Settings → select Google reCAPTCHA V2.
- Create a reCAPTCHA V2 site at Google reCAPTCHA admin. Step-by-step guide.
- Copy the Site Key and Secret Key into WP Ghost’s fields.
- Optional: set the reCAPTCHA theme (Light/Dark) and language.

Google reCAPTCHA V3
Invisible to users – no checkbox, no challenge. reCAPTCHA V3 scores each request based on behavior and returns a spam score (visible in your Google reCAPTCHA account). Legitimate users see no friction; suspicious traffic is blocked silently. Requires a V3 Site Key and Secret Key. Learn more about V3.
To activate:
- Go to Brute Force > Settings → select Google reCAPTCHA V3.
- Create a reCAPTCHA V3 site at Google reCAPTCHA admin.
- Copy the Site Key and Secret Key into WP Ghost’s fields.

Google reCAPTCHA Enterprise
Google’s enterprise-grade reCAPTCHA with advanced risk analysis. Returns a spam score like V3 but with more granular risk signals. Requires a Google Cloud account with reCAPTCHA Enterprise API enabled. Learn more about Enterprise.
To activate:
- Go to Brute Force > Settings → select Google reCAPTCHA Enterprise.
- Enable reCAPTCHA Enterprise API in Google Cloud Console.
- Create an Enterprise key. Optional: disable Use checkbox challenge for a score-only (invisible) setup, or leave it on for the “I’m not a robot” challenge.
- Copy the Site Key ID into WP Ghost.
- Copy the Project ID from Google Cloud.
- Create a Google Cloud API Key at API Credentials and paste it into WP Ghost.
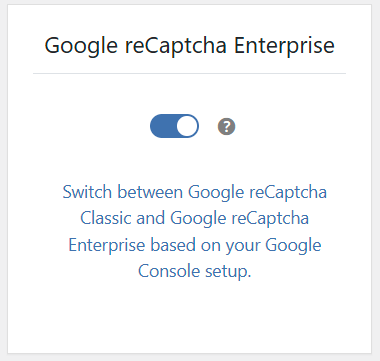
Checkbox challenge: If you enable the “I’m not a robot” challenge box in Google Cloud, make sure you also enable it in WP Ghost’s settings. Both must match to avoid functionality errors.
Troubleshooting
Locked out of my own site
If you’ve been locked out by brute force protection, wait for the ban duration to expire (default: 1 hour). If you can’t wait, check the emergency disable guide, use the rollback settings, or add a constant in wp-config.php to disable WP Ghost temporarily. To prevent future lockouts, whitelist your IP.
reCAPTCHA not showing on the login page
Verify that Brute Force Protection is active and the reCAPTCHA type is selected. For Google V2/V3/Enterprise, check that Site Key and Secret Key are correct and that your domain is registered in the Google reCAPTCHA admin. Clear all caches and test in an incognito browser.
Google reCAPTCHA says “ERROR for site owner”
The Site Key or Secret Key is incorrect, or the domain isn’t registered for the key. Double-check both keys in your Google reCAPTCHA admin console. Ensure the domain listed matches your site’s domain exactly (including or excluding www).
Frequently Asked Questions
Which reCAPTCHA type should I use?
Math reCAPTCHA for simplicity – no API keys, no Google dependency. Google V2 for the familiar checkbox experience. Google V3 for invisible protection with no user friction. Enterprise for advanced risk analysis on high-value sites. Most sites should start with Math reCAPTCHA or Google V3.
Does this protect WooCommerce?
Yes. Enable WooCommerce Support in Brute Force > WooCommerce to add brute force protection to the WooCommerce login form. WP Ghost is fully compatible with WooCommerce.
Does this work with Elementor login forms?
Use the hmwp_bruteforce shortcode to add brute force protection to any custom login form, including those built with Elementor, Divi, and other page builders. See the Elementor integration guide.
Can I translate brute force messages?
Yes. When WPML or Polylang is active, brute force messages can be translated from WPML > String Translation or Polylang > Languages > String Translations.
Does WP Ghost modify WordPress core files?
No. Brute Force Protection is added through WordPress hooks and filters. No core files are modified. Disabling the feature removes all protections instantly.
Related Tutorials
Complete your login security system:
- Two-Factor Authentication – Add a second verification step after the password.
- Magic Link Login – Passwordless login via email link.
- Change and Hide the Login Path – Move your login page to a custom URL.
- Firewall Security – Block injection attacks at the server level.
- Brute Force in Elementor Login Forms – Add protection to custom page builder forms.
- Register a New Google reCAPTCHA V2 – Get your Site Key and Secret Key.