Add two-factor authentication to your WordPress login with WP Ghost – by authenticator app, email code, or passkey (Face ID, Touch ID, Windows Hello). 2FA requires a second verification step after the password, so a stolen password alone can’t grant access. WP Ghost supports three methods: authenticator app codes (Google Authenticator, Authy, Microsoft Authenticator, LastPass), email-delivered codes, and passkeys (biometric/hardware authentication). Each method includes configurable fail limits, lockout messages, backup codes, and a centralized login monitor. This is a free feature available in all versions of WP Ghost.
What Is Two-Factor Authentication?

Two-Factor Authentication (2FA) requires two forms of verification to log in: something you know (your password) and something you have (a code from your phone, email, or biometric authentication). Even if an attacker obtains your password through a data breach, phishing, or brute force, they can’t log in without the second factor.
WP Ghost offers three 2FA methods. You can enforce a single method for all users, or enable User Choice for 2FA so each user picks their preferred method from their profile.
Why 2FA Is Essential
Passwords alone are no longer sufficient. Here’s why 2FA is critical for your hack prevention strategy:
Brute force attacks surged 130% in 2024. LLAR’s 2025 report documented a massive increase in automated login attacks. Even with brute force protection limiting attempts, a leaked password from another breach can succeed on the first try. 2FA makes that leaked password useless – the attacker still can’t get past the second factor.
Password reuse is rampant. Most users reuse passwords across multiple sites. When a third-party service is breached, those credentials are tested against WordPress sites immediately (credential stuffing). 2FA blocks these attacks entirely regardless of the password.
Passkeys eliminate phishing entirely. WP Ghost’s Passkey method (Face ID, Touch ID, Windows Hello, hardware keys) is resistant to phishing because there’s no code to intercept and no credential to enter. The authentication happens on the user’s device and can’t be replayed.
How to Enable 2FA in WP Ghost
Activate the 2FA Feature
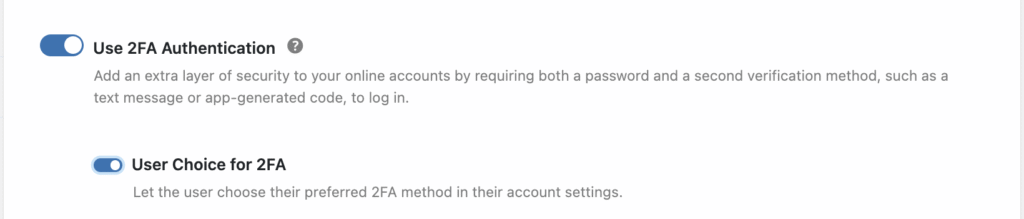
2FA is not active by default – enable it first.
- Go to WP Ghost > Overview > Features.
- Switch on 2FA in the features list.
- Click Start Feature Setup to access the 2FA settings page.

Choose a 2FA Method
Go to WP Ghost > 2FA Login > Settings. Select one of the three methods: 2FA Code (authenticator app), Email Code, or Passkey. Or enable User Choice for 2FA to let each user choose their own method.

Configure Shared Settings
All three 2FA methods share the same configurable settings. Configure these once – they apply regardless of which method is active:
Max Fail Attempts – How many times a user can enter an incorrect 2FA code before their IP is blocked. Default: 5 attempts.
Ban Duration – How long (in seconds) an IP stays blocked after exceeding max attempts. Default: 900 seconds (15 minutes).
Failed Attempts Message – The alert shown to a user when there have been failed 2FA attempts on their account. Uses {count} for the number of failed attempts and {time} for the duration since the last failed attempt.
Lockout Message – The message shown instead of the login form when a user is locked out. Uses {time} for the number of seconds until they can try again.
Delete 2FA Data on Uninstall – When enabled, uninstalling WP Ghost deletes all 2FA configuration. Users will need to set up 2FA again if you reinstall.
Click Save after configuring.
2FA Code Method (Authenticator App)
Users scan a QR code with an authenticator app (Google Authenticator, Authy, Microsoft Authenticator, or LastPass Authenticator). The app generates a rotating one-time code that changes every 30 seconds. Users enter the current code on the login page after their password.
To activate: Go to WP Ghost > 2FA Login > Settings, select 2FA Code and click Save.

To set up per user: Click Add Two-Factor Authentication. You’ll be taken to the User Profile section where you scan the QR code with your authenticator app and enter the generated code to verify. For detailed app-specific guides, see: Google Authenticator, Authy, Microsoft Authenticator, LastPass Authenticator.
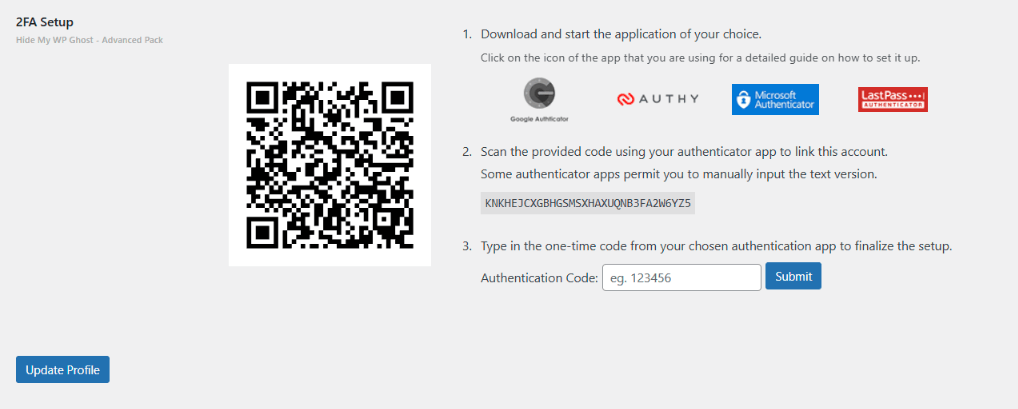
Some authenticator apps only support manual text entry instead of QR scanning. The text version of the key is shown in Step 2 of the setup. Use Reset Key if you need to re-sync your authenticator app.
After verification, generate and download backup codes. These one-time-use codes are your recovery option if you lose access to your authenticator app.

2FA Email Code Method
A unique one-time code is sent to the user’s registered email address on each login. The user enters the code on the login page to complete authentication. No app installation required – just email access.
To activate: Go to WP Ghost > 2FA Login > Settings, select Email Code and click Save.

To set up per user: Click Add Two-Factor Authentication. Enter the email address where codes should be sent. Click Submit. Generate and download backup codes for recovery if email delivery fails.

Email delivery required: This method depends on your site’s ability to send emails reliably. Use an SMTP plugin (WP Mail SMTP, FluentSMTP, or Easy WP SMTP) to ensure codes are delivered. Without SMTP, codes may not reach users. Generate backup codes as a safety net.
2FA Passkey Method
Passkeys use your device’s built-in security – Face ID, Touch ID, Windows Hello, Android biometrics, or hardware security keys – to verify your identity. No codes to type, no emails to wait for. After entering your password, your device prompts you to authenticate. One tap or glance, and you’re in.
To activate: Go to WP Ghost > 2FA Login > Settings, select Passkey and click Save.

To set up per user: Click Add Two-Factor Authentication. Click Add Passkey. Your browser or device will prompt you to create a passkey. Confirm the prompt to complete setup. You can add multiple passkeys (e.g., laptop fingerprint + phone Face ID).


Device requirement: Passkeys require a device that supports them – Windows Hello, Touch ID, Face ID, Android biometrics, or a compatible browser password manager. If you lose your device, use the Remove Passkey option from another authenticated session or use backup codes.
Monitor 2FA Logins
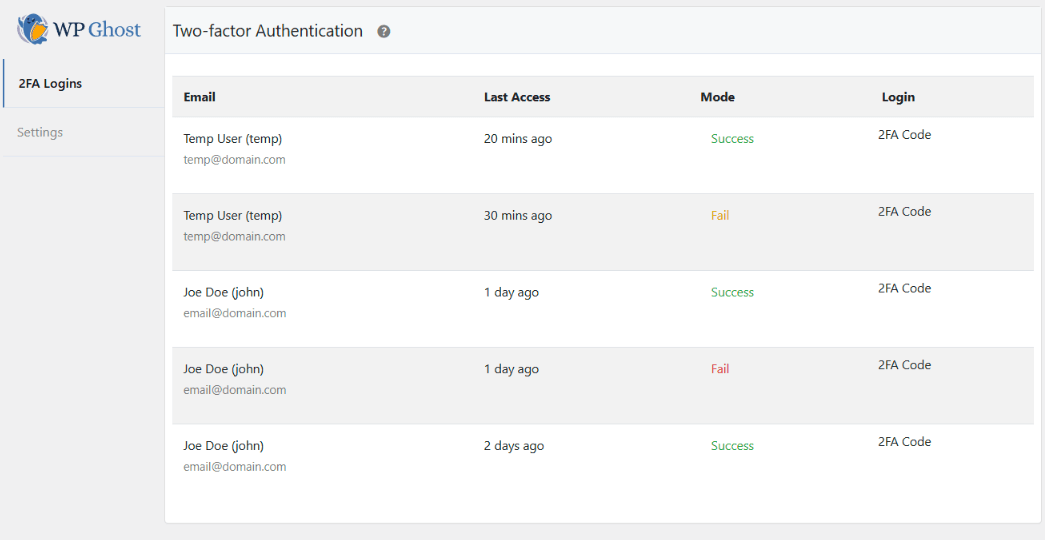
Track all 2FA authentication attempts from WP Ghost > 2FA Login > 2FA Logins. The monitor shows: the user’s email, the timestamp of the last access, whether the attempt succeeded or failed, and which 2FA method was used. Check this regularly to identify unusual activity – repeated failed attempts from the same account may indicate a targeted attack.
Troubleshooting
2FA code from authenticator app is not accepted
The most common cause is a time sync issue between your device and the server. Authenticator codes are time-based – if your device’s clock is off by more than 30 seconds, codes will be invalid. On your phone, enable automatic time sync. If the problem persists, use the Reset Key option in your user profile and re-scan the QR code.
Email code is not arriving
Your site can’t send emails reliably. Install and configure an SMTP plugin. Check spam/junk folders. If you’re locked out, use a backup code to log in, then fix email delivery.
Locked out and can’t access 2FA
Use a backup code. If you didn’t generate backup codes, check the emergency disable guide, use the rollback settings, or add a constant in wp-config.php to disable WP Ghost temporarily. This removes the 2FA requirement so you can log in and reconfigure.
Passkey not working on a new device
Passkeys are device-specific. A passkey created on your laptop doesn’t automatically work on your phone. Add a separate passkey from each device you use. If you can’t authenticate on any device, use a backup code and register a new passkey from the authenticated session.
Frequently Asked Questions
Which 2FA method should I use?
Passkey is the most secure – it’s phishing-resistant and the fastest to use. 2FA Code (authenticator app) is the most widely compatible and doesn’t depend on email delivery. Email Code requires no app installation but depends on reliable email delivery. If you’re unsure, start with 2FA Code (authenticator app) or enable User Choice to let each person decide.
What are backup codes and why are they important?
Backup codes are one-time-use recovery codes that let you log in if you lose access to your authenticator app, email, or passkey device. Generate and download them during 2FA setup. Store them in a safe place (password manager, printed in a secure location). Each code can only be used once.
Is 2FA free in WP Ghost?
Yes. All three 2FA methods (Code, Email, Passkey) are included in the free version of WP Ghost.
Does 2FA work with WooCommerce?
2FA applies to the WordPress login form. If WooCommerce uses the standard WordPress login (which is the default), 2FA protects it. WP Ghost is fully compatible with WooCommerce.
Can I translate 2FA messages?
Yes. When WPML or Polylang is active, 2FA messages and button labels can be translated from WPML > String Translation or Polylang > Languages > String Translations.
Does WP Ghost modify WordPress core files?
No. 2FA is added through WordPress hooks and filters. No core files are modified. Disabling the 2FA feature removes all 2FA requirements instantly.
Related Tutorials
Complete your login security system:
- Setting Up 2FA with Mobile Apps – Step-by-step guides for Google Authenticator, Authy, Microsoft Authenticator, and LastPass.
- Magic Link Login – Passwordless login via email link.
- Temporary Logins – Passwordless time-limited URLs for developers and clients.
- Brute Force Protection – Block login attacks with attempt limits and reCAPTCHA.
- Change and Hide the Login Path – Move your login page to a custom URL.