Block SQL injection, script injection, and exploit attempts before they reach WordPress using WP Ghost’s built-in firewall. The firewall filters malicious HTTP requests at the server level using 7G and 8G rulesets, automatically blocks repeat offenders by IP, removes unsafe server headers, blocks theme detector crawlers, and prevents AI bots from scraping your content. It’s a defense layer that stops attacks before WordPress even loads – complementing WP Ghost’s path-security features with active request filtering.
What Is the WP Ghost Firewall?

A Web Application Firewall (WAF) is a security system that monitors incoming HTTP/HTTPS traffic and blocks requests that match known attack patterns. WP Ghost includes a built-in WAF that filters traffic through server-level rules, blocking malicious queries, injection attempts, and exploit payloads before they reach WordPress core, your plugins, or your database.
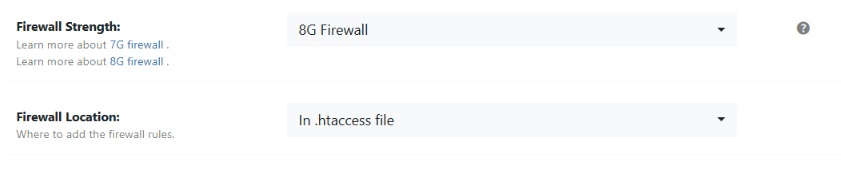
WP Ghost’s firewall operates through configuration-file-level filters (`.htaccess` on Apache, or WordPress initialization on Nginx/LiteSpeed). This means malicious requests are intercepted at the earliest possible point – before PHP processes the request, before WordPress loads, and before any plugin code executes. The firewall offers four protection levels (Minimal, Medium, 7G, and 8G), with the 8G Firewall being the recommended option for maximum protection.
Why Your Site Needs Firewall Protection
path security makes your site invisible. The firewall makes it defended. Together, they form a complete hack prevention strategy:
Most attacks are automated injection attempts. SQL injection and script injection are the most common attack vectors against WordPress. Patchstack’s 2024 report found that 43% of WordPress vulnerabilities were exploitable without authentication. Bots send thousands of injection queries per day, probing for database access, file inclusion, and code execution. The firewall blocks these at the request level – the query is rejected before it reaches any vulnerable code.
The firewall blocks attacks before WordPress loads. When placed in the `.htaccess` file (Apache), firewall rules execute at the web server level – before PHP starts, before WordPress initializes, before any plugin loads. This means a blocked request uses minimal server resources. Thousands of malicious requests cost almost nothing to reject, reducing server load while improving security.
It complements path security. WP Ghost’s path-security features reduce your attack surface by making WordPress invisible. The firewall catches whatever gets through – requests that aren’t targeting WordPress-specific paths but still contain malicious payloads. A SQL injection in a contact form submission, a script injection in a search query, a directory traversal attempt – the firewall blocks these regardless of your path configuration.
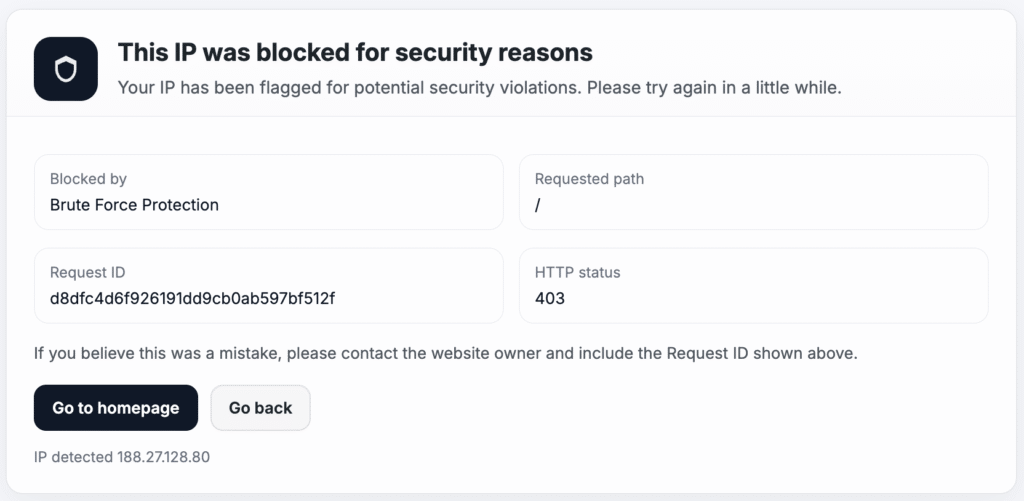
Automated IP blocking escalates protection. Individual blocked requests are informative. Repeated blocked requests from the same IP are indicative of a targeted attack. WP Ghost’s automated IP blocking detects these patterns and blacklists persistent attackers – turning individual blocks into a comprehensive ban.
How to Configure WP Ghost Firewall
The firewall includes six configurable features. The injection filter is the core; the rest are supplementary layers.
Keep WP Ghost updated: The firewall’s malicious query list is continuously updated. Newer versions include protection against the latest attack patterns. Always maintain the latest version of WP Ghost on your site.
Activate Firewall Against Injections
- Go to WP Ghost > Overview or WP Ghost > Firewall.
- Switch on Firewall Against Script Injection.
- Select a firewall level.

Four protection levels are available:
Minimal – Basic injection filtering. Most compatible with all server configurations and plugins. Start here if you’re unsure.
Medium – Extended pattern matching. Blocks more attack vectors while maintaining broad compatibility.
7G Firewall – Comprehensive server-level filtering based on Jeff Starr’s 7G ruleset. Blocks script injection, SQL injection, and common exploit patterns.
8G Firewall (recommended) – The latest and most advanced ruleset. Includes all 7G protections plus updated patterns for modern attack techniques. This is the recommended setting for maximum security.
On Apache servers, you can place firewall rules directly in the .htaccess file (fastest – blocks at web server level) or load them during WordPress initialization (broader compatibility).
The 8G Firewall (Recommended)
The 8G Firewall, developed by security expert Jeff Starr, is the most advanced firewall ruleset available in WP Ghost. It provides advanced protection against script injection, SQL injection, and exploit attempts through lightweight server-level filtering that blocks malicious requests before they reach WordPress core.

Learn more about the 8G Firewall.
Compatibility note: The 7G and 8G Firewall rulesets may not be compatible with all server configurations. If you experience issues with legitimate functionality being blocked, try Medium or Minimal levels first, then escalate.
Automate IP Blocking
Turn the firewall into an adaptive protection system by automatically blocking IP addresses that trigger repeated attacks.
- Go to WP Ghost > Firewall.
- Switch on Automate IP Blocking.
- Configure the rule: set the number of attacks that trigger a block, the time window, and whether the block is temporary or permanent.
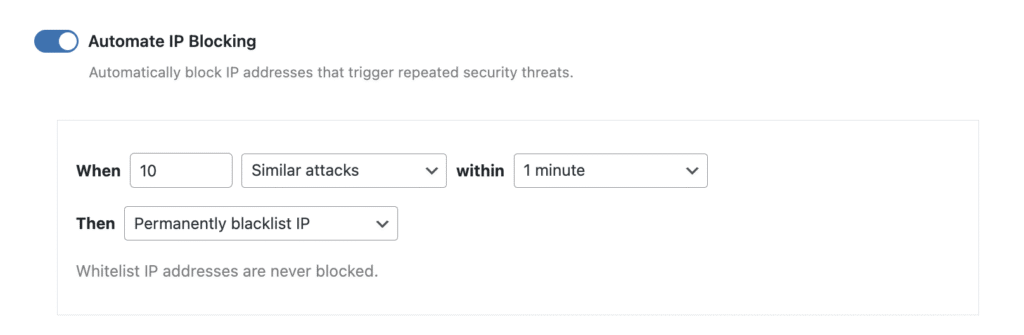
Example: Block an IP permanently if it triggers 10 similar attacks within 1 minute. This eliminates repeated attack attempts without manual intervention. Whitelisted IPs are never blocked.
Remove Unsafe Headers
HTTP response headers can reveal your PHP version, server software, and WordPress identity. Removing them strips another layer of information from attackers.
- Go to WP Ghost > Firewall > Header Security.
- Switch on Remove Unsafe Headers.

This removes the PHP version header (X-Powered-By), server info, server signature, and WordPress-related headers from HTTP responses. For complete header security including Content-Security-Policy and other protective headers, see the Header Security tutorial.
Block Theme Detectors
Block the crawlers used by popular CMS detection services from accessing your site entirely.
- Go to WP Ghost > Firewall > Header Security.
- Switch on Block Theme Detectors Crawlers.

This blocks crawlers from WP Theme Detector (wpthemedetector.com), BuiltWith (builtwith.com), IsItWP (isitwp.com), Wappalyzer (wappalyzer.com), WhatCMS (whatcms.org), Gochyu (gochyu.com), WP Detector (wpdetector.com), Scan WP (scanwp.net), and others. For more on defeating these tools, see the Hide from WordPress Theme Detectors tutorial.
Block AI Crawler Bots
Block AI training and scraping bots at the firewall level while automatically adding them to your robots.txt.
- Go to WP Ghost > Firewall.
- Switch on Block AI Crawler Bots.
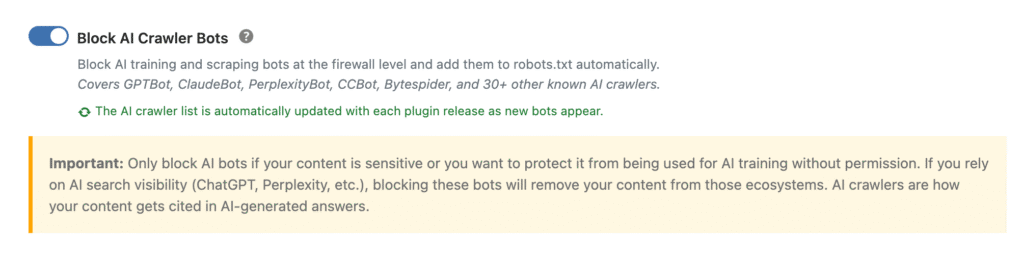
This blocks GPTBot, ClaudeBot, PerplexityBot, CCBot, Bytespider, and over 30 other known AI crawlers. The AI crawler list is automatically updated with each plugin release.
Consider the trade-off: Only block AI bots if your content is sensitive or you specifically want to prevent AI training use. If your site benefits from AI search visibility (being cited by ChatGPT, Perplexity, etc.), blocking these crawlers removes your content from those ecosystems. These crawlers source the citations used in AI-generated answers.
Troubleshooting
Legitimate functionality blocked by the firewall
Some plugins or theme features may use query patterns that match firewall rules. If a form submission, AJAX request, or admin action stops working after enabling the firewall, try a lower firewall level (Medium or Minimal). You can also whitelist specific paths in Firewall > Whitelist Paths to exclude them from firewall filtering.
Search engine crawlers being blocked
WP Ghost automatically whitelists Googlebot, Bingbot, Yandex, and other major search engine crawlers for 7G and 8G firewall levels. If you notice indexing issues, check the firewall logs to see if any legitimate crawler is being blocked. You can add it to the whitelist manually.
If you’ve lost access or something broke, check the emergency disable guide, use the rollback settings, or add a constant in wp-config.php to disable WP Ghost temporarily.
Frequently Asked Questions
Which firewall level should I use?
Start with 8G Firewall (recommended). It offers the most comprehensive protection. If you experience compatibility issues with plugins or themes, step down to 7G, then Medium, then Minimal. Each level is progressively more compatible but less protective. Most modern WordPress setups work fine with 8G.
Can I use this alongside Wordfence or Solid Security?
Yes. WP Ghost’s firewall operates at the server configuration level (`.htaccess`) while Wordfence and Solid Security operate at the PHP/application level. They protect at different layers and complement each other. WP Ghost blocks malicious requests before WordPress loads; Wordfence provides application-level scanning and monitoring after WordPress loads.
Does the firewall affect performance?
It improves performance for sites under attack. Malicious requests are rejected at the server level with minimal resource usage – they never reach PHP or WordPress. For legitimate traffic, the overhead is negligible. The firewall rules are pattern-matching directives processed by the web server, which is far more efficient than PHP-level filtering.
Does the firewall affect SEO?
No. WP Ghost automatically whitelists major search engine crawlers (Googlebot, Bingbot, Yandex, and others) when the firewall is active. Legitimate crawlers access and index your site normally. The firewall only blocks requests that match malicious patterns.
Does this work with WooCommerce?
Yes. WooCommerce checkout, cart, AJAX, and payment processing work normally with the firewall enabled. If a specific WooCommerce feature is blocked, whitelist the affected path. WP Ghost is fully compatible with WooCommerce.
Does WP Ghost modify WordPress core files?
No. The firewall uses server-level configuration rules (`.htaccess` on Apache) or WordPress initialization hooks (on Nginx/LiteSpeed). No core files are modified. Disabling the firewall or deactivating WP Ghost removes all firewall rules instantly.
Related Tutorials
Build your complete defense with complementary features:
- The 8G Firewall Protection – Deep dive into the 8G ruleset and what it blocks.
- Header Security – Add Content-Security-Policy and other protective HTTP headers.
- Brute Force Protection – Block login attacks with attempt limits and reCAPTCHA.
- Hide from WordPress Theme Detectors – Complement firewall blocking with source code hiding.
- Geo Security – Block or allow traffic by country.
- Disable XML-RPC Access – Block the legacy protocol used for amplification attacks.