Moving your WordPress site from HTTP to HTTPS is a foundational security step. HTTPS encrypts the connection between your visitors’ browsers and your server, protecting login credentials, form data, and payment information from interception. Modern browsers mark HTTP sites as “Not Secure,” and search engines favor HTTPS sites in rankings. This guide covers the complete migration: obtaining an SSL certificate, updating WordPress URLs, setting up redirects, and forcing SSL on admin pages.
Why HTTPS Matters for WordPress Security

HTTPS (Secure HTTP) uses an SSL/TLS certificate to encrypt data transferred between the browser and server. Without HTTPS, login credentials, form submissions, and payment data travel in plain text and can be intercepted. Browsers display “Not Secure” warnings on HTTP sites, and search engines give ranking preference to HTTPS sites. Every WordPress site should use HTTPS, especially sites with login forms, WooCommerce checkout, or any user data collection. WP Ghost’s security headers feature (including HSTS) works best when your site is already on HTTPS.
Step 1: Get an SSL Certificate
Most WordPress hosting providers include free SSL certificates (typically via Let’s Encrypt). Check with your hosting provider or enable SSL through your hosting control panel. Free SSL is available from most major hosts including WP Engine, SiteGround, Bluehost, Hostinger, DreamHost, InMotion Hosting, and many others.
If your host doesn’t offer free SSL, you can obtain one from a certificate authority. Once you have the certificate, ask your hosting provider to install it if you’re not sure how.
Step 2: Update WordPress URLs
After the SSL certificate is installed, update WordPress to use HTTPS:
- Go to Settings > General.
- Change WordPress Address (URL) from
http://tohttps://. - Change Site Address (URL) from
http://tohttps://. - Click Save Changes.
- WordPress logs you out. Log back in using the HTTPS URL.

Step 3: Set Up HTTP to HTTPS Redirect
Add a server-level redirect so all HTTP requests are permanently redirected to HTTPS.
For Apache and LiteSpeed servers, add the following to your .htaccess file:
<IfModule mod_rewrite.c>
RewriteEngine On
RewriteCond %{HTTPS} off
RewriteRule ^(.*)$ https://%{HTTP_HOST}%{REQUEST_URI} [L,R=301]
</IfModule>
For Nginx servers, add the following to your server block configuration:
server {
    listen 80;
    server_name yourdomain.com www.yourdomain.com;
    return 301 https://yourdomain.com$request_uri;
}
Replace yourdomain.com with your actual domain name.
Step 4: Force SSL on Admin and Login
To ensure the WordPress admin area and login pages always use HTTPS, add the following constant to wp-config.php before the /* That's all, stop editing! */ comment:
define('FORCE_SSL_ADMIN', true);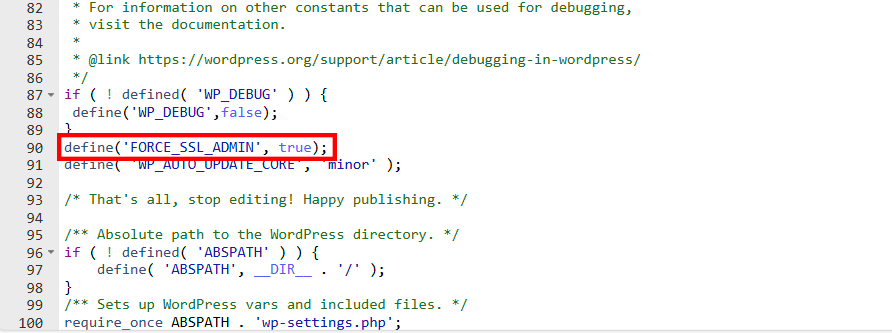
This forces HTTPS on the WordPress admin dashboard and login page. It also works on WordPress multisite networks.
Mixed content after migration. After switching to HTTPS, you may see “mixed content” warnings if images, scripts, or stylesheets still load over HTTP. Update hardcoded HTTP URLs in your content using a search-and-replace tool (like Better Search Replace) to change http://yourdomain.com to https://yourdomain.com across your database.
WP Ghost and HTTPS. WP Ghost works on both HTTP and HTTPS sites, but HTTPS is strongly recommended. WP Ghost’s security headers feature (including Strict-Transport-Security / HSTS) requires HTTPS. After migrating to HTTPS, enable HSTS at WP Ghost > Tweaks > Security Headers to tell browsers to always use HTTPS for your domain.
Frequently Asked Questions
Does WP Ghost handle the HTTP to HTTPS migration?
No. The HTTP to HTTPS migration is a WordPress and server-level configuration, not a WP Ghost feature. WP Ghost enhances security on top of HTTPS by adding security headers (including HSTS), hiding WordPress paths, and preventing attacks. Complete the HTTPS migration first, then configure WP Ghost.
Will switching to HTTPS affect my SEO?
Positively. Search engines favor HTTPS sites. The 301 redirect from HTTP to HTTPS preserves your existing SEO value and passes link authority to the HTTPS URLs. There may be a brief adjustment period in search rankings, but the long-term benefit is positive.
What is mixed content?
Mixed content occurs when your HTTPS page loads some resources (images, scripts, stylesheets) over HTTP. Browsers may block these resources or show warnings. Fix it by updating hardcoded HTTP URLs in your database content, theme files, and plugin settings to use HTTPS.
Does WP Ghost modify WordPress core files?
No. WP Ghost uses rewrite rules and WordPress hooks. No core files are modified. The FORCE_SSL_ADMIN constant in this guide is a standard WordPress constant added to wp-config.php, not a WP Ghost feature.
Related Tutorials
HTTPS and security headers:
- Content Security Policy (CSP) – Configure CSP headers after HTTPS migration.
- WP Ghost and Really Simple SSL – Compatibility with the Really Simple SSL plugin.
- Change WordPress Paths – Path security works best on HTTPS.
- WP Ghost Constants Reference – All wp-config.php constants.