Extend WP Ghost’s Text Mapping to the content inside META tags – titles, descriptions, and other meta content that standard Text Mapping doesn’t reach. WP Ghost’s core Text Mapping replaces class names and identifiers in your HTML body. But META tags in the <head> section – like <title> and <meta name="description"> – can contain WordPress or plugin references that leak through. The Meta Mapping extension applies Text Mapping rules to these META tags too, closing the last gap in your source code.
What Is Meta Mapping?

WP Ghost – Meta Mapping is a free extension that extends Text Mapping to the content inside frontend META tags. While the core Text Mapping feature handles class names and identifiers in the HTML body, Meta Mapping applies your replacement rules to the text within <title>, <meta name="description">, and other head-section META elements.
For example, if your SEO plugin generates a page title or description that includes the word “WordPress” or a plugin name, Meta Mapping replaces that text with your custom alternative – the same way Text Mapping replaces class names in the body. The replacement rules are configured in the same Text Mapping interface; the extension simply broadens where those rules apply.
Why Meta Tags Need Mapping
META tags are another location where WordPress references can survive after you’ve cleaned up everything else. Here’s why this matters for your hack prevention strategy:
SEO plugins can embed CMS references in titles and descriptions. Some SEO configurations, theme settings, or automated title generators include “WordPress” or plugin names in the meta title or description. A page title like “Blog – Powered by WordPress” or a description mentioning “WooCommerce store” appears in the <head> section of every affected page. Standard Text Mapping doesn’t process these META tag contents.
Search result snippets show META content. The text in your <title> and <meta description> tags appears in Google search results. If these contain “WordPress” or plugin names, the CMS reference is visible not just in the source code but in search engine listings – making it publicly accessible without even visiting your site.
Scanners read META content. Theme detectors and CMS scanners parse the <head> section specifically looking for CMS-related keywords in titles, descriptions, and meta content. Meta Mapping ensures your replacement rules cover these tags too.
How to Install and Configure Meta Mapping
Meta Mapping is a separate extension that installs alongside WP Ghost. Once installed, it integrates into the existing Text Mapping interface – no separate configuration panel.
Install the Meta Mapping Extension
Prerequisite: WP Ghost must be installed and configured first.
Download the extension:
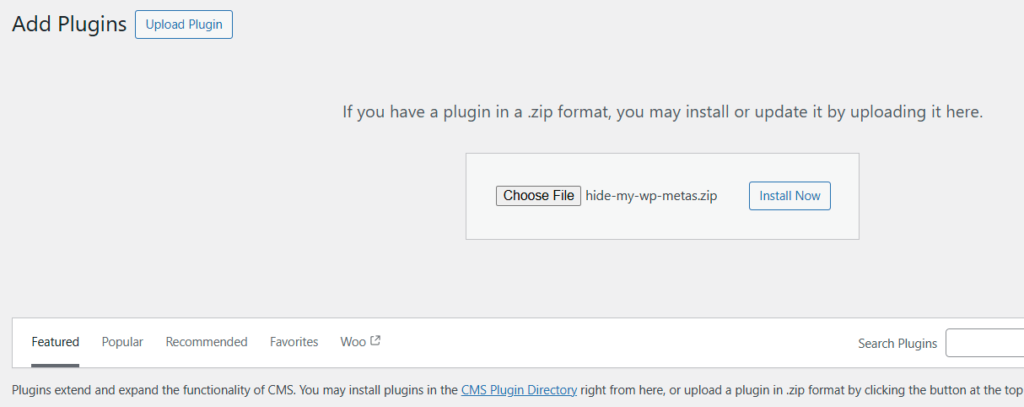
- Log in to your WordPress admin dashboard.
- Go to Plugins > Add New > Upload Plugin.
- Upload the
hide-my-wp-metas.zipfile. - Install and activate the plugin.
Add Meta Mapping Rules
Meta Mapping uses the same Text Mapping interface – no separate settings page. Your existing Text Mapping rules now also apply to META tag content.
- Go to WP Ghost > Mapping > Text Mapping.
- Enter the text you want to change in the left field (e.g.,
WordPress). - Enter the replacement text in the right field (e.g., your site name or a generic term).
- Click Add Another Text to add more rules as needed.
- Click Save to apply.

After saving, your Text Mapping rules apply to both the HTML body (standard behavior) and META tag content (added by the Meta Mapping extension). View your page source and check the <title> and <meta> tags to confirm the replacements are working.

Note: Meta Mapping is a free extension with broad flexibility. Because it modifies META tag content across all scenarios, it cannot be tested against every plugin combination. Technical support is not provided for this extension. Test thoroughly after enabling.
Frequently Asked Questions
What’s the difference between Meta Mapping and standard Text Mapping?
Standard Text Mapping replaces class names and text in the HTML body. Meta Mapping extends those same rules to the content inside META tags in the <head> section – titles, descriptions, and other meta elements. Without the extension, Text Mapping rules don’t apply to META tag content.
Will this affect my SEO?
It changes the text content of your META tags, which means your page titles and descriptions in search results will reflect the replacements. If you replace “WordPress” with your brand name, search results will show your brand name instead. This is typically a positive change for branding. Be careful not to replace text that’s important for keyword targeting – only replace CMS and plugin identifiers.
Do I need this extension?
Only if your META tags contain WordPress or plugin references that you want to remove. Check your page source: search for “WordPress” or plugin names inside <title> and <meta> tags. If they’re clean, you don’t need the extension. If they contain CMS references, Meta Mapping handles them.
Is this extension free?
Yes. WP Ghost – Meta Mapping is a free extension available to all WP Ghost users. Download it from your account and install alongside WP Ghost. Note that technical support is not provided for this free extension.
Does WP Ghost modify WordPress core files?
No. Meta Mapping modifies META tag content in the HTML output at runtime through WordPress filters. No files are modified. Deactivating the extension restores original META tag content instantly.
Related Tutorials
Complete your text and identity hiding strategy:
- Text Mapping – The core Text Mapping feature for class names and body content.
- Advanced Text Mapping – Use {blank} and {rand} patterns for class name hiding.
- Hide WordPress Generator META Tags – Remove the generator tag from your page head.
- Hide IDs from META Tags – Remove plugin identifiers from element IDs.
- Hide from WordPress Theme Detectors – The complete guide to defeating CMS scanning tools.