WP Ghost is fully compatible with LiteSpeed Cache. LiteSpeed Cache is a high-performance caching plugin that handles page caching, CSS/JS optimization, image optimization, and CDN integration via QUIC.cloud. To use both plugins together while keeping WP Ghost’s path security intact, you need to enable WP Ghost’s Change Paths in Cache Files option so cached and optimized files reference your custom paths. If you use QUIC.cloud CDN, you also need to whitelist the QUIC.cloud IP addresses in WP Ghost’s firewall. This guide walks through the complete configuration.

Why LiteSpeed Cache Needs WP Ghost Configuration

Cache plugins like LiteSpeed Cache save pre-rendered HTML files containing the actual paths to your CSS, JavaScript, plugins, themes, and uploads. When WP Ghost changes these paths, the live page output uses the new paths – but cached HTML files still reference the old WordPress defaults until they’re regenerated. Without coordinating LiteSpeed Cache and WP Ghost, your visitors see cached pages exposing /wp-content/plugins/ and /wp-content/themes/ even though WP Ghost is active. Additionally, if you use QUIC.cloud CDN with Ghost Mode, QUIC.cloud servers need to be whitelisted so they can connect to your site without being blocked by WP Ghost’s firewall.
Step 1: Enable LiteSpeed Caching
If you haven’t already enabled LiteSpeed’s page caching:
- Go to LiteSpeed Cache > Cache.
- Enable Enable Cache if it’s not already active.
- Configure your caching preferences (page types to cache, cache lifespan, logged-in users, etc.).
- Save the settings.

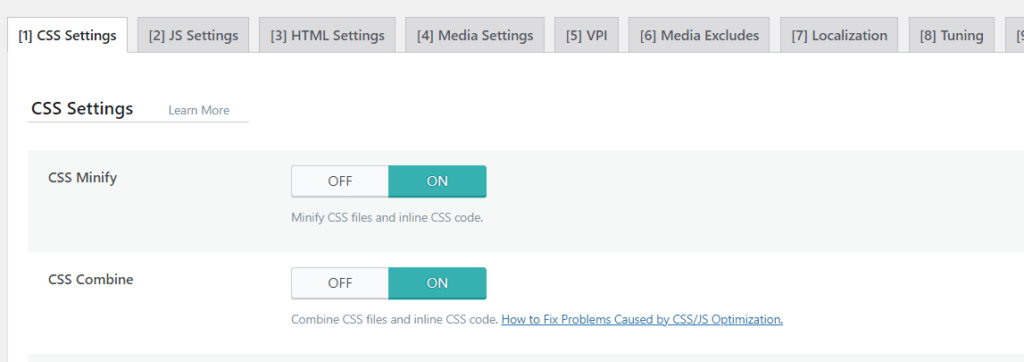
Step 2: Enable Page Optimization
LiteSpeed Cache’s Page Optimization feature minifies and combines CSS and JS files for faster page loads. This creates additional optimized files that WP Ghost also needs to coordinate with.
- Go to LiteSpeed Cache > Page Optimization.
- Enable the CSS Minify and JS Minify options.
- Optionally enable CSS Combine and JS Combine to reduce HTTP requests.
- Save the settings.
Step 3: Enable Change Paths in Cache Files in WP Ghost
Now tell WP Ghost to rewrite the paths inside LiteSpeed’s cached files. This is the critical step that ensures cached HTML pages reference your custom WP Ghost paths instead of the WordPress defaults.
- Go to WP Ghost > Advanced > Tweaks.
- Find Change Paths in Cache Files.
- Toggle it ON.
- Click Save.
For complete configuration details, see Change Paths in Cached Files.
Important: After enabling this option, purge the LiteSpeed cache so the next page generation creates fresh cached files with the updated paths. Go to the LiteSpeed Cache icon in the WordPress admin bar and click Purge All. Without purging, your old cached files will continue serving the original paths until they expire.
QUIC.cloud CDN Configuration
If you use QUIC.cloud CDN with LiteSpeed Cache, you need to whitelist the QUIC.cloud IP addresses in WP Ghost’s firewall. When WP Ghost is in Ghost Mode, it may block external services attempting to connect to your site, including QUIC.cloud’s servers.
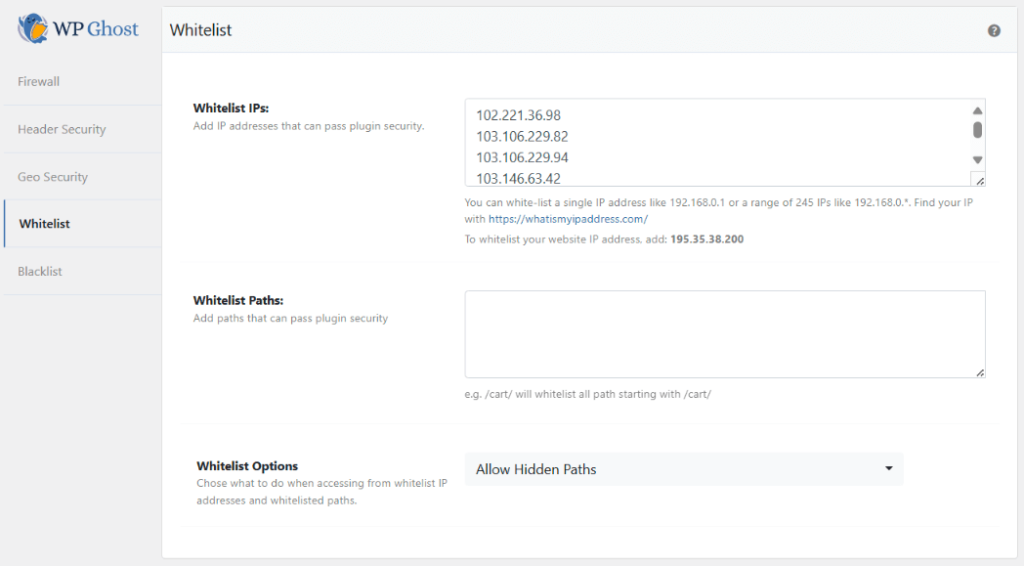
Whitelist QUIC.cloud IP Addresses
- Log in to your WordPress dashboard.
- Go to WP Ghost > Firewall > Whitelist > Whitelist IPs.
- Visit the QUIC.cloud IPs page to get the latest list of IP addresses.
- Copy the IP addresses from the QUIC.cloud page.
- Paste them into the Whitelist IPs section in WP Ghost.
- Click Save.
Obtain the LiteSpeed Domain Key
After whitelisting the QUIC.cloud IPs, obtain the Domain Key that authenticates your site with QUIC.cloud:
- Go to LiteSpeed Cache > General.
- Find the Domain Key section.
- Click Request Domain Key.
- LiteSpeed connects to QUIC.cloud to retrieve the key. Because you’ve whitelisted the IPs, this should complete successfully.
Domain Key request fails? This usually means the QUIC.cloud IPs aren’t whitelisted correctly, or the IP list has changed since you last configured it. Revisit the QUIC.cloud IPs page, update the whitelist, save, and try requesting the Domain Key again. QUIC.cloud updates their IP list periodically, so check for new addresses if the connection stops working later.
Verify the Setup
- Visit your site in an incognito/private browser window so you get a freshly cached version.
- Right-click and select View Page Source.
- Search for
wp-content/pluginsandwp-content/themes. They should NOT appear – you should see your custom WP Ghost paths instead. - If you use QUIC.cloud, check that CDN-served pages also show the custom paths (purge the CDN cache first if needed).
- Run a Security Check in WP Ghost to confirm all settings are applied.
Troubleshooting
Cached pages still show wp-content/plugins paths
The LiteSpeed cache hasn’t been purged since enabling Change Paths in Cache Files in WP Ghost. Click the LiteSpeed Cache icon in the admin bar and select Purge All. Visit a few pages while logged out to regenerate the cache with the updated paths.
Domain Key request fails
QUIC.cloud IPs aren’t whitelisted or the IP list has changed. Visit quic.cloud/ips, update the whitelist in WP Ghost, save, and retry the Domain Key request. If the issue persists, temporarily switch WP Ghost to Lite Mode to test whether the connection works, then switch back to Ghost Mode and troubleshoot the whitelist.
Site looks broken after enabling CSS/JS Combine
This is a common LiteSpeed Page Optimization issue, not a WP Ghost conflict. Some JS/CSS files have dependencies that break when combined out of order. In LiteSpeed Page Optimization, exclude the problematic files from combining or disable CSS/JS Combine while keeping minification enabled.
QUIC.cloud CDN serves old paths after WP Ghost path changes
The CDN cache is stale. Purge the QUIC.cloud CDN cache from LiteSpeed Cache > CDN > Manage or from your QUIC.cloud dashboard. CDN edge servers hold cached versions that won’t update until purged.
Frequently Asked Questions
Do I need to whitelist QUIC.cloud IPs if I don’t use the CDN?
No. The QUIC.cloud IP whitelist is only needed if you use the QUIC.cloud CDN service with LiteSpeed Cache. If you only use LiteSpeed’s local page caching and optimization features (without CDN), no IP whitelisting is necessary.
Do I need to purge LiteSpeed cache every time I save WP Ghost settings?
Yes, whenever you change paths in WP Ghost. Cached files contain the old paths until regenerated. Purge the LiteSpeed cache after any WP Ghost path change to ensure visitors see the updated paths immediately.
Does this apply to LiteSpeed web server or just the plugin?
Both. The LiteSpeed Cache plugin works on any web server (Apache, Nginx, LiteSpeed), but provides additional server-level caching features when running on a LiteSpeed web server. WP Ghost is compatible with both the LiteSpeed Cache plugin and the LiteSpeed web server. On LiteSpeed servers, WP Ghost writes rewrite rules to .htaccess just like Apache.
Does this work with WooCommerce?
Yes. WP Ghost is fully compatible with WooCommerce and LiteSpeed Cache works with WooCommerce too. Make sure LiteSpeed excludes cart, checkout, and account pages from caching (this is typically configured by default).
Does WP Ghost modify WordPress core files?
No. WP Ghost writes rewrite rules to .htaccess (Apache/LiteSpeed) or hidemywp.conf (Nginx) and uses WordPress hooks for application-level changes. No core files are modified. Deactivating WP Ghost restores all defaults instantly.
Related Tutorials
WP Ghost with cache and performance plugins:
- Change Paths in Cached Files – Detailed configuration of the WP Ghost cache rewrite feature.
- WP Ghost and Hummingbird – Another cache plugin compatibility guide.
- WP Ghost and Breeze – Another cache plugin compatibility guide.
- Compatible Plugins List – All cache and performance plugins tested with WP Ghost.
- Emergency Disable – Recovery via FTP if needed.