
WP Ghost works on Google Cloud Platform with Apache configuration. Google Cloud’s default WordPress deployment sets AllowOverride None in the Apache config, which means .htaccess files are ignored. WP Ghost needs .htaccess rewrite rules to function. The fix is to enable mod_rewrite and change AllowOverride to All via SSH. This is a one-time server configuration step, and after it’s done, WP Ghost works normally.
Why Google Cloud Needs Extra Setup

Google Cloud’s WordPress images (via Deployment Manager or Marketplace) use Apache with AllowOverride None as the default. This is a security-conservative default that prevents .htaccess files from overriding server configuration. WordPress itself, most cache plugins, and WP Ghost all depend on .htaccess rewrite rules. Without AllowOverride All, WordPress permalinks, caching rules, and WP Ghost’s path security rules are all ignored by Apache. Enabling AllowOverride All also unlocks WordPress permalink support if it wasn’t working before.
Step 1: Enable mod_rewrite in Apache
Connect to your Google Cloud instance via SSH and enable the Apache rewrite module:
- In the Google Cloud Console, go to Compute Engine > VM instances.
- Enable
mod_rewrite:
sudo a2enmod rewrite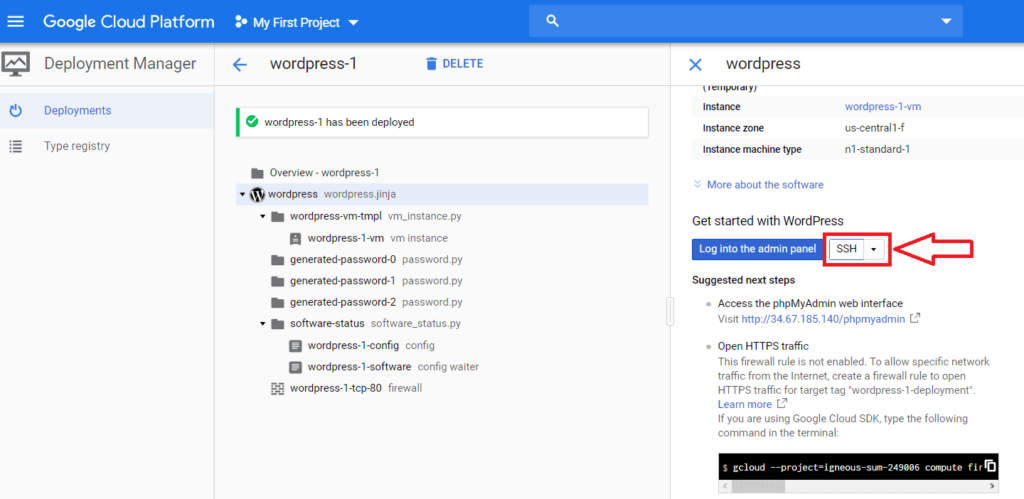
Already enabled? If mod_rewrite is already enabled, the command outputs “Module rewrite already enabled.” That’s fine. Proceed to Step 2.
Step 2: Set AllowOverride All
Edit the Apache configuration to allow .htaccess files to override server settings:
- Open the Apache config file:
sudo nano /etc/apache2/apache2.conf- Find the
<Directory /var/www/>block and changeAllowOverride NonetoAllowOverride All:
<Directory /var/www/>
    Options Indexes FollowSymLinks
    AllowOverride All
    Require all granted
</Directory>- Save and exit: press Ctrl + X, then Y, then Enter.
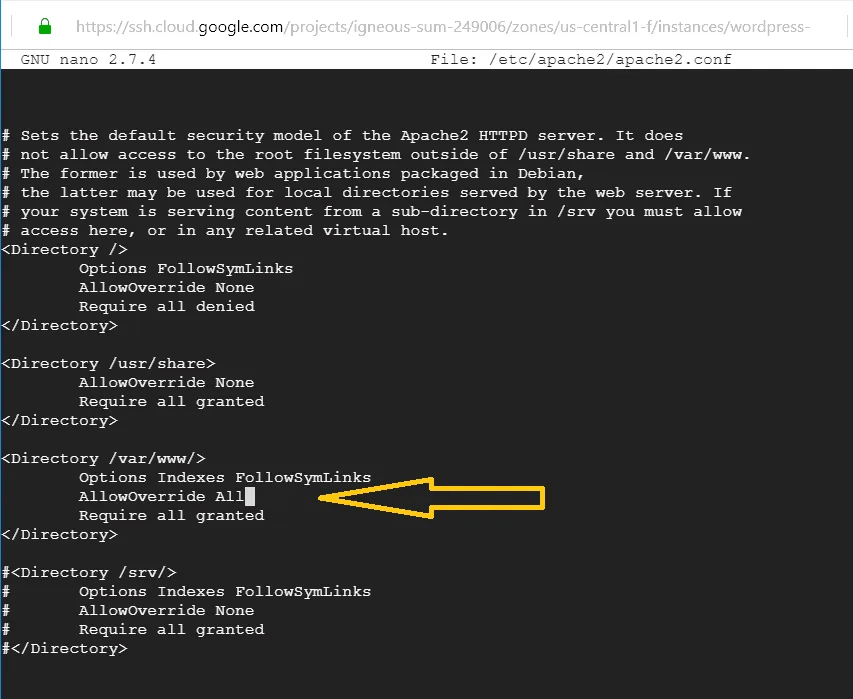
Check the correct Directory block. The config file may have multiple <Directory> blocks. Make sure you edit the one for /var/www/ (your web root), not /var/www/html/ or another directory. If your WordPress installation is in a subdirectory, you may need to change the corresponding <Directory> block as well.
Step 3: Restart Apache and Test
Restart Apache to apply the changes, then verify WP Ghost works:
- Test the Apache config for syntax errors:
sudo apache2ctl configtest- If the output shows
Syntax OK, restart Apache:
sudo service apache2 restart- Go to WP Ghost > Change Paths > Level of Security.
- Select Safe Mode or Ghost Mode, customize paths, and click Save.
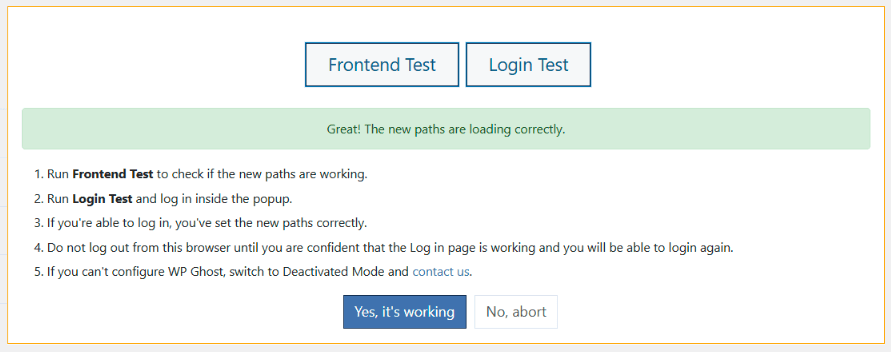
- Run the Frontend Login Test.
- If everything loads correctly, click “Yes, it’s working”.
- If something is broken, click “No, abort” to roll back.
Troubleshooting
Custom paths return 404 after enabling WP Ghost
Apache isn’t processing .htaccess rules. Verify AllowOverride All is set for the correct directory in /etc/apache2/apache2.conf. Run sudo apache2ctl configtest to check for syntax errors. Confirm mod_rewrite is enabled with apache2ctl -M | grep rewrite. Restart Apache after any changes.
Apache won’t restart after editing config
There’s a syntax error in apache2.conf. Run sudo apache2ctl configtest to see the specific error and line number. Common causes include unclosed <Directory> tags, extra characters, or editing the wrong block. Fix the error and try restarting again.
WordPress permalinks also not working
This confirms AllowOverride is still set to None. WordPress permalinks depend on .htaccess rewrite rules too. Once you set AllowOverride All and restart Apache, both WordPress permalinks and WP Ghost custom paths should work.
Locked out after configuration
SSH back into your Google Cloud instance and either fix the Apache config or use the Safe URL parameter to bypass WP Ghost temporarily. If that doesn’t work, see the Emergency Disable guide to deactivate WP Ghost via SSH/SFTP.
Frequently Asked Questions
Is this a one-time setup?
Yes. Once mod_rewrite is enabled and AllowOverride All is set, the configuration persists across Apache restarts. You don’t need to repeat these steps. After this setup, WP Ghost writes to .htaccess automatically like any standard Apache server.
Does this apply to other cloud platforms?
This guide is specific to Google Cloud’s default Apache configuration. Other cloud platforms (AWS, Azure, DigitalOcean) may have the same issue if their WordPress images default to AllowOverride None. The same fix applies: enable mod_rewrite, set AllowOverride All, restart Apache. The exact config file path may differ by distribution. See the Set AllowOverride All on Apache guide for distribution-specific paths.
What if my Google Cloud instance uses Nginx?
This guide is for Apache-based deployments. If your Google Cloud WordPress instance runs Nginx, follow the Custom Nginx Config File guide instead. You can check your web server with apachectl -v (Apache) or nginx -v (Nginx) via SSH.
Does WP Ghost modify WordPress core files?
No. WP Ghost writes rewrite rules to .htaccess and uses WordPress hooks for application-level changes. No core files are modified. Deactivating WP Ghost restores all defaults instantly.
Related Tutorials
Apache and server configuration:
- Set AllowOverride All on Apache – General Apache guide with distribution-specific paths.
- Custom Nginx Config File – Setup for Nginx servers.
- Windows IIS Server Setup – Setup for IIS servers.
- Safe URL Parameter – Bypass WP Ghost temporarily if needed.
- Emergency Disable – Recovery via SSH/SFTP if needed.