You can disable WP Ghost’s path changes on specific pages or URLs. This is useful when a particular page has compatibility issues with WP Ghost’s path security, or when a third-party service needs to access original WordPress paths on certain pages. There are two methods: the built-in Whitelist Paths setting (no code needed) and a PHP filter for more advanced conditional logic.
When to Disable WP Ghost on Specific Pages

Most pages work fine with WP Ghost’s path changes. However, some situations require disabling path processing on specific pages: a page builder or form plugin that loads assets using hardcoded WordPress paths, a third-party integration (payment gateway, booking system) that requires original paths to function, an embedded iframe or external widget that breaks when paths are rewritten, or a landing page served by a page builder that doesn’t process through WordPress’s standard asset pipeline.
Method 1: Whitelist Paths (Recommended)
The simplest way to exclude specific pages. No code needed.
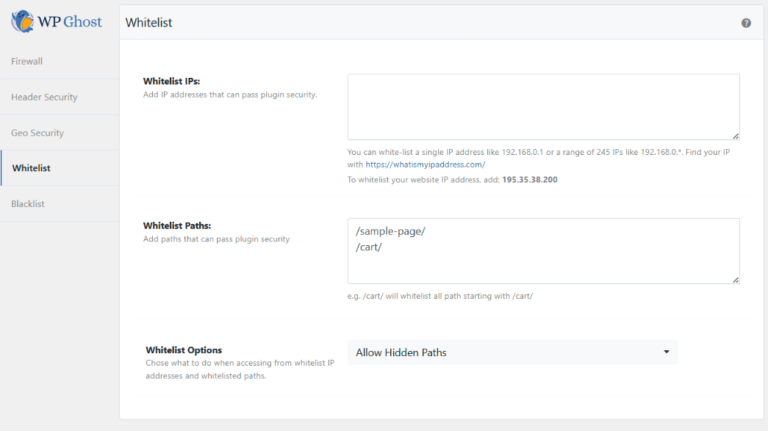
- Go to WP Ghost > Change Paths > Whitelist Options.
- Enter the slug or relative URL of each page you want to exclude. For example, to exclude a page at
yourdomain.com/sample-page/, add/sample-page/. - Click Save.

WP Ghost stops processing path changes on any page that matches a whitelisted path. The page loads with original WordPress paths while all other pages continue using the custom paths.
Use leading and trailing slashes. Enter paths as /your-page/ (with slashes) for exact matching. You can add multiple paths, one per line. Partial matches also work: adding /shop/ excludes all pages under /shop/ including subpages.
Method 2: Filter in functions.php (Advanced)
For more granular control (conditional logic based on page type, user role, or other WordPress conditions), use the hmwp_process_init filter.
Add the following code to your child theme’s functions.php file or a code snippets plugin:
add_filter('hmwp_process_init', function($process) {
    // Disable WP Ghost on a specific page by slug
    if (is_page('your-page-slug')) {
        return false;
    }

    return $process;
});
Replace 'your-page-slug' with the slug of the page where you want to disable WP Ghost. To exclude multiple pages, add additional conditions:
add_filter('hmwp_process_init', function($process) {
    // Disable on multiple pages
    if (is_page(['contact', 'booking', 'payment'])) {
        return false;
    }

    // Disable on all WooCommerce product pages
    if (function_exists('is_product') && is_product()) {
        return false;
    }

    return $process;
});
Use a child theme or code snippets plugin. Adding code to functions.php in the parent theme means your changes are lost when the theme updates. Use a child theme or a code snippets plugin to keep the filter persistent. Always back up your site before adding custom code.
Frequently Asked Questions
Which method should I use?
Use Method 1 (Whitelist Paths) for most cases. It requires no code and works by URL pattern matching. Use Method 2 (filter) only when you need conditional logic that the whitelist can’t express, such as disabling based on page type, custom post type, user role, or other WordPress conditions.
Does whitelisting a page reduce security?
Whitelisted pages show original WordPress paths, which means bots can identify WordPress on those specific pages. However, WP Ghost’s firewall, brute force protection, 2FA, and security headers still apply to whitelisted pages. Only the path changes are disabled. Keep whitelisted pages to the minimum needed.
Does this work with WooCommerce pages?
Yes. You can whitelist WooCommerce pages like /checkout/, /cart/, or /my-account/ if they have compatibility issues. With Method 2, you can use WooCommerce conditionals like is_checkout(), is_cart(), or is_product() for precise control.
Does WP Ghost modify WordPress core files?
No. Both the Whitelist Paths setting and the hmwp_process_init filter work through WordPress’s built-in hooks. No core files are modified.
Related Tutorials
WP Ghost compatibility and configuration:
- Change WordPress Paths – Main path security configuration.
- Compatible Plugins List – All tested plugin compatibilities.
- Emergency Disable – Disable WP Ghost completely if needed.
- Safe URL Parameter – Bypass WP Ghost temporarily for testing.