
What is a Temporary Login?

The Temporary Logins feature helps you create a temporary login URL with any user role. This URL grants access to the website dashboard without requiring a username and password.
This feature will come in handy whenever you need to create temporary accounts to give you access to the admin area of your site for a limited amount of time.
Keep reading to learn more about this feature and how to use it to increase security for your site.
How To Use Temporary Login Accounts?
Many website owners hire developers to make small adjustments or changes to their websites. To implement these tweaks, make edits, or check certain things on websites, these developers may need access to the admin area.
If the developer you hired for the job is someone you trust, you can always create an administrator account for them.
Then, when they finish their work on your website, you can delete the account you’ve created for them.
Another option is to add new users and authors in WordPress and later block the user (this does NOT require deleting their account).
The problem with both these options is that sometimes you may forget that you’ve given someone privileges that allow them to make changes on your site.
This puts your website at risk. With the Temporary Logins feature, you’ll no longer have to worry about possible security threats and data safety issues.
This feature allows you to create temporary accounts that require no password to log in and are automatically disabled after a given time.
In other words, you won’t have to worry about having to remember to remove someone’s access yourself.
Let’s see how you can easily create temporary logins in WordPress that require no passwords.
How to Use Temporary Logins with WP Ghost
Activate Temporary Logins
By default, the Temporary Logins feature is not activated in WP Ghost and is not visible in the menu. To activate the feature, follow these steps:
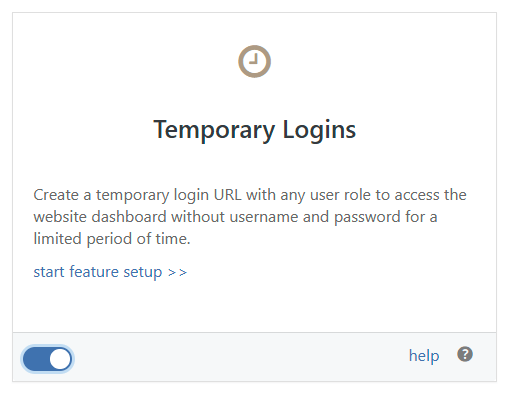
- Go to WP Ghost > Overview > Features.
- From features list, switch on Temporary Logins feature to activate the feature options.
- Click on Start Feature Setup to access Temporary Logins Settings page.
Click on the Start Feature Setup link to access the Temporary Login Settings page.
Temporary Login Settings
Default User Role
This option lets you select a default user role for the temporary user. Use the drop-down list to select your desired default user role.

Default Redirect After Login
This option allows you to set a default custom page to which you want the user to be redirected after they log in. Use the drop-down list to select the page to which the user should be redirected.

Default Temporary Expire Time
This option allows you to define a default time period, after which the temporary account will automatically expire. This period starts after the user’s first access to your site.

Note! The settings you make for every temporary login you create for your site override the default settings you’ve enabled here.
Delete Temporary Users on Plugin Uninstall
If you uninstall WP Ghost on your site, by activating this setting, WP Ghost will automatically delete all Temporary Users you’ve created using the Temporary Logins feature.

Create a New Temporary Login
Once you have set the default values for a temporary login account, you can create a new one.
- Go to WP Ghost > Temporary Logins > Settings.
- Click on the Add New Temporary Login to activate the new temporary login popup.

Once you click on Add New Temporary Login, you will be able to configure the following:
- Email (required): provide an email address for the user to which you want to grant temporary login rights
- First Name: add the user’s first name
- Last Name: add the user’s last name
- User Role: select a user role for the user
- Redirect after login: This option allows you to redirect the user to a custom page after they log in. Use the drop-down list to select where the user should be redirected after login.
- Expire time: This option allows you to define the time period after which the temporary account will automatically expire. This period starts after the user’s first access to your site.
- Language: The last thing you can customize here is the language for the new user. You choose the language, and the user will see the WordPress dashboard.

After you finish your settings, don’t forget to click the Create button to add your new temporary login user!
Managing Temporary Logins
Once you’ve created your temporary logins, you can easily manage them from the Temporary Logins section.
This section shows you the complete list of temporary logins you have created for your website.
Plus, for each temporary login user you’ve added to your site, WP Ghost will show you:
- the user’s name and email address
- the role currently assigned to them
- the date when they last logged in
- expiry duration

For every temporary login user you’ve created for your site, WP Ghost also enables you to take different actions.
These actions are located under the Options column and include. We’ll go through each one of these options one by one next.
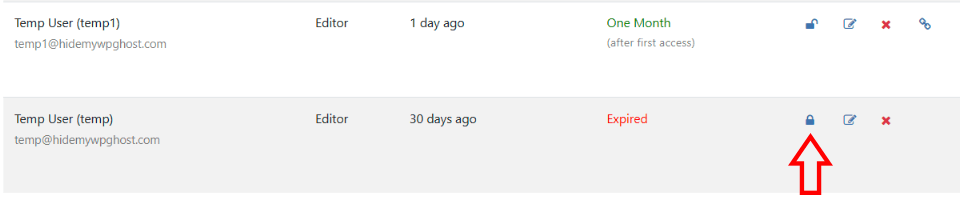
Lock/Unlock Temporary Login User
The lock option allows you to expire a login before its expiry. The unlock option reverses this setting.
To lock or unlock a temporary login user, simply click on the icon shown in the screenshot below.
Edit Temporary Login User
You can edit your existing temporary login users at any time by clicking on the Edit icon shown in the screenshot below.
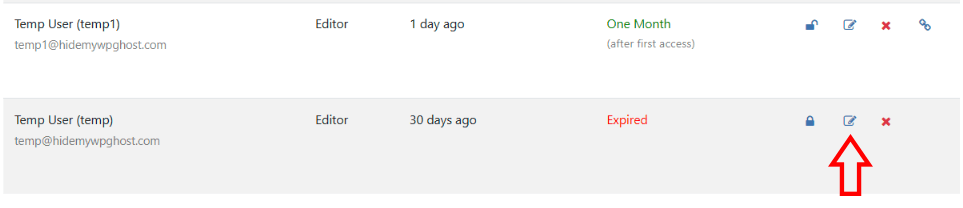
Make the edits you want and then click on Save User to save your changes.

Delete Temporary Login User
To permanently delete a temporary login user from your website, click on the X icon shown in the screenshot below.

Copy the Temporary Login URL
To copy the temporary login URL, click on the link icon shown in the screenshot below.

Troubleshooting
Temporary Login URL is Redirecting to the Home Page
Clear all cache
If you have a cache plugin or use server caching, clear all the cache, as the change of paths has significantly changed the website’s structure.
If possible, try accessing the login page from a different browser or device to see if the issue is specific to a particular setup.
Other Plugins Conflict
Other security plugins installed on your website might be redirecting the temporary login URL to the home page. These plugins could delete the session created by the WP Ghost plugin, disrupting the temporary login process.
To identify and resolve this conflict, we recommend creating a staging website. Start by testing only the theme with the WP Ghost plugin active on this staging site. Then, activate your other plugins one by one.
This method will help you pinpoint which plugin is causing the conflict, allowing you to adjust settings or find an alternative solution.
Check Temporary Account Redicts
Edit the temporary user account and check if you add the Redirect After Login option correctly. Try adding the Dashboard page to redirect the user to WordPress admin dashboard after login.